Wednesday, February 24, 2010

Apple-Cranberry Stuffed Pork Tenderloin

This tasty stuffed pork recipe appealed to even my somewhat anti-pork mom, so I know it's a winner!  The meat is fairly easy to prepare, and comes out of the oven moist and flavorful.  The apple filling combines well with the pork to create a tasty main dish.  We had it for New Year's Day (yes, this post is very late!), and this is the perfect impressive dish for a special day. It's also not overly complicated - the filling is simply simmered together until tender and then pureed in a food processor or blender, and the small-sized pork tenderloins are easy to deal with.  For example, because of their smaller size, I didn't find the need to bother with tying them up with kitchen twine. 


We were lucky enough to find these pork tenderloins at a local meat shop in Ohio, where my parents live.  It's a great spot - the meat is butchered right there on the premises, and you can watch the process through big glass windows!  (This may not be a plus for everyone, but I thought it was great - and you certainly know your meat is fresh!)


Apple-Cranberry Stuffed Pork Tenderloin (adapted from Simply Recipes, original recipe here)
Serves 4


Filling
1 cup apple cider
1/2 cup cider vinegar
3/4 cup packed light brown sugar
1 large shallot, peeled, thinly sliced
1 apple, diced
1/2 cup dried cranberries
1 T grated fresh ginger
1 T yellow mustard seeds
1/2 tsp ground allspice
1/8 to 1/4 tsp cayenne pepper

Pork Roast
2 pork tenderloins, about 1-1/2 pounds total
Kosher salt and freshly ground black pepper

1. Before starting on the pork, put the pork tenderloins in the freezer for 30 minutes to make it easier to cut. While the pork is chilling, make the filling.
2. Bring all the filling ingredients to simmer in medium saucepan over medium-high heat. Cover, reduce heat to low, and cook until apples are very soft, about 20 minutes. Strain through a fine-mesh sieve, reserving the liquid. Use a rubber spatula to press against the apple mixture in the sieve to extract as much liquid out as possible. Return liquid to saucepan and simmer over medium-high heat until reduced to 1/2 cup, about 5 minutes. Remove from heat, set aside and reserve this liquid for use as a glaze. Pulse apple mixture in food processor, about fifteen 1-second pulses. Set aside.
3. Preheat oven to 350°F Place a cookie cooling rack in an 8-1/2x11 baking dish and set aside.
4. Lay one tenderloin down on a cutting board. Insert the knife into the pork 1/2-inch horizontally from the bottom of the pork, along the long side of the tenderloin. Make a long cut along the bottom of the roast, stopping 1/2 inch before the edge of the roast. You might find it easier to handle by starting at a corner of the roast.  Open up the tenderloin and continue to cut through the thicker half of the pork, again keeping 1/2 inch from the bottom. Repeat until the pork is an even 1/2-inch thickness all over when laid out.  If necessary, pound the pork to an even thickness with a meat pounder.  Repeat with the second tenderloin.
5. Season the inside of both tenderloins well with salt and pepper. Spread out the filling evenly on the two pieces of pork, leaving a 1/2-inch border from the edges. Roll each tenderloin back up. If needed, secure with kitchen twine at 1-inch intervals (I did not need to do this). Season the outside of the pork generously with salt and pepper.6. Place tenderloins on the cookie rack, and place in oven, on the middle rack.
7. Cook for 45 to 60 minutes, until the internal temperature of the pork is 130 to 135 degrees. Brush with half of the glaze and cook for 5 minutes longer. Remove the tenderloins from the oven. Place on a cutting board. Tent with foil to rest and keep warm for 15 minutes before slicing.
8. Slice into 1/2-inch wide pieces, removing the cooking twine as you cut the roast. Serve with remaining glaze.


Delicious served with snap peas, warm potato salad, rosemary bread, and jello salad.  Not pictured here is my aunt's green tomato-grape chutney, which was an excellent accompaniment.

Monday, February 22, 2010

Buffalo Sweet Potato Pizza with Sourdough Crust

This is one of those totally bizarre but ultimately delicious pizza combinations that really works!  The sweet potatoes pair well with the spicy Buffalo sauce, and the blue cheese sprinkled on top adds the perfect tang.  You could definitely also make this dish with a combination of sweet potatoes and shredded chicken or only chicken, although I found the vegetarian version very satisfying.  You could also make your own Buffalo sauce, or just be lazy like me and buy a jar!  One word of warning - although both varieties of sweet potatoes would be delicious here, you might want to go for the orange ones for aesthetic reasons.  I bought the white-fleshed sort by mistake and wasn't thrilled with the color when they came out of the oven.  (Of course, they get covered in sauce and cheese, but still!)  Either way, this is definitely the pizza to make when you're in the mood for something unusual and tasty.

Buffalo Sweet Potato Pizza (adapted from bitchincamero, original recipe here)
1-2 sweet potatoes, peeled and chopped into small cubes
Olive oil
Buffalo sauce, to taste
Shredded mozzarella cheese
Blue cheese, crumbled
Sourdough Pizza Crust, recipe below

1. Preheat the oven to 375 degrees. Toss the sweet potato with a bit of olive oil, and then spread out on a foil-lined baking sheet. Roast until the sweet potatoes are cooked through and tender, stirring occasionally.
2. Preheat the oven to 500 degrees. Stretch out one round of pizza dough and place on pizza pan. Brush a very thin layer of olive oil over the crust.
3. In a bowl, mix together the sweet potatoes with Buffalo sauce until well coated. Top the pizza with cubes of sweet potato. Sprinkle mozzarella and blue cheeses over the sweet potatoes.
4. Bake the pizza until the crust is crispy and the mozzarella is brown, about 10 minutes.

Sourdough Pizza Crust (adapted from King Arthur Flour)
1 cup (or so) fed or unfed sourdough starter
1/2 cup warm water
2 1/2 cups all-purpose flour
1 tsp kosher salt
1/2 tsp instant yeast
1 tsp oil (optional)

1. Mix everything together in the bowl of a stand mixer until everything is just incorporated.
2. Knead on low speed until the dough is smooth and supple. Add more water or flour as needed.
3. Place the dough in an oiled bowl, spray oil on the ball of dough, and then cover with plastic wrap.
4. Let rise until doubled, which could take anywhere from a few to several hours (depending on how fed and how active your sourdough starter is).
5. Punch down the dough, spray again with oil, cover with plastic wrap, and pop in the fridge. (Or, don't pop it in the fridge and just move on to step 6.)
6. A couple of hours before you're ready to bake the pizzas, pull the dough out of the fridge and gently divide into 4 or so pieces (less pizzas for thicker crusts, more for thinner crusts). Spray with oil, cover with plastic, and let rise for a couple of hours.
7. Preheat the oven to 500 degrees. Carefully stretch a ball of pizza dough to fit your pan. Top, and then bake until the crust is browned and the cheese is bubbling (cooking time will depend on thickness of crust). Repeat with remaining balls of dough.

Saturday, February 20, 2010

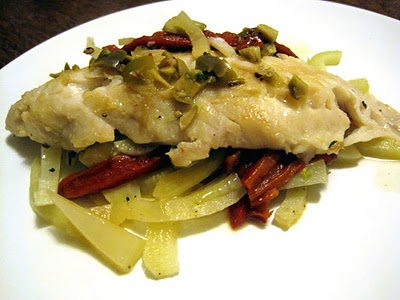
Snapper with Fennel, Roasted Red Peppers, and Green Olives

This snapper recipe comes from a book on cooking for one, but I adapted it for myself and my housemate.  The recipe could be easily multiplied to feed any number of people, and it's really quick to pull together for a fast supper that tastes gourmet.

We found 3/4 pound of fish to be perfect for two people (it was one large piece cut in half), but feel free to adjust that depending on your appetite.  I like to just tell the fish monger I'm looking for something like snapper and then ask him to recommend what's good that day.  This strategy has never failed me!  The rest of the ingredients are easy to pick up at the olive bar if your grocery store has one, which is nice because you can purchase just the right amount.  I chose a variety of green olives with bits of garlic; any upscale olive would be tasty chopped up here.  The olives add a fantastic acidic note to the dish.  Next time, I might add capers to add even more of this element.  I also grabbed a few roasted red peppers at the olive bar.  Finally, fresh fennel sauteed slowly until it becomes soft adds sweetness and a mild anise flavor, rounding out the flavors in the dish perfectly.

Snapper with Fennel, Roasted Red Peppers, and Green Olives (adapted from The Pleasures of Cooking for One)
Serves 2

1 fennel bulb, fronds reserved
1 T olive oil
Salt and freshly ground black pepper
1 thick slice snapper, about 3/4 pound
Salt and pepper
Large pinch herbes de Provence
About 6 wide strips roasted red pepper, cut into thinner strips
1/3 cup white wine
Several olives, coarsely chopped
Sprinkling of chopped fennel fronds

Slice the fennel very thinly. Heat the oil in a small frying pan, add the fennel, and season with salt and pepper. Cook over very low heat until it begins to soften, about 5 minutes. Clear the bottom of the pan and lay in the snapper, salted and peppered. Sprinkle on the herbes de Provence and roasted red peppers. Pour in the wine, and braise for 5-6 minutes, covered, turning once, and adding the olives during the last minute of cooking. Garnish with chopped fennel fronds.

Saturday, February 13, 2010

Asian Pear-Ginger Frozen Yogurt

This pear-ginger frozen yogurt is both healthy and tasty.  Because it's lower in fat than ice cream, it doesn't have quite the creamy quality of a full-fat ice cream, but it's still a very satisfying dessert, kind of like gingery pear snow.  I thought the frozen yogurt had plenty of ginger flavor with only 2 teaspoons of grated ginger, but feel free to add the full amount if you're a ginger fanatic. 

Asian Pear-Ginger Frozen Yogurt (adapted from The Steamy Kitchen Cookbook)
Makes around 2 pints

2 very large Asian pears
1/2 tsp freshly squeezed Meyer lemon juice
2-3 tsp freshly grated ginger
1-1/2 cups (375 g) Greek-style plain yogurt
1/2 cup sugar
Generous pinch of salt

1. Peel and dice the pears.  Toss with the lemon juice to prevent browning.  Put the pears and ginger in a blender and puree until smooth.  (You might have to use a tablespoon of water or so to get things moving.)
2. In a large bowl, combine the pear-ginger mixture with the yogurt, sugar, and salt.  Chill at least 1 hour.
3. Freeze in your ice cream maker.

Wednesday, February 10, 2010

Simple Yellow Cupcakes with Tangerine Curd

I made another batch of my favorite yellow cupcakes a few weeks ago, this time paired with tangerine curd.  I'm just crazy about these cupcakes - they always bake up perfectly and look gorgeous, plus they're moist and delicious!  I made the tangerine curd because we had a couple of tangerines that looked like they were going downhill, and I wanted to use them up.  It's a really easy recipe that makes a small amount of curd - perfect for using up some extra tangerines and "frosting" a batch of cupcakes!  I love the flavor of orange-y curds like this one - sweet and tangy with great tangerine flavor. 


Simple Yellow Cupcakes 

Tangerine Curd (adapted from The Kitchn, original recipe here)

1/2 cup freshly squeezed tangerine juice
Zest of two tangerines (finely grated with a microplane zester)
1 T lemon juice
1 large egg
2 large yolks
1/4 cup granulated sugar
4 tablespoons unsalted butter, cut into chunks and softened
Pinch of salt

1. Pour the tangerine juice into a small sauce pan over medium-high heat. Bring the juice to a rapid simmer and let it reduce down to approximately 1/4 cup. This should take 2-4 minutes.
2. Transfer the tangerine juice to a measuring cup to cool. Stir in the zest and lemon juice.
3. In a small saucepan, whisk together the egg, yolks, and sugar. When the orange juice is no longer hot, whisk it into the egg mixture in a steady stream.  Set the saucepan over medium heat. Whisk constantly until the mixture has thickened to a pudding-like consistency - about 6-8 minutes or until the mixture is 180°. 
4. Strain the mixture into a clean bowl to remove the zest and any bits of cooked egg.  Briskly whisk in the butter and the pinch of salt while the curd is still hot.
5. Cover the curd with plastic wrap touching the surface so that it does not form a skin as it cools.  Chill until ready to use, up to one week.

Sunday, February 7, 2010

Currant-Ginger Banana Bread

This banana bread is yummy and relatively healthy, with oatmeal, fruit, and mostly egg whites.  The ginger didn't come through as strongly as I wanted, so I'd add more next time.  I love the currants here - tiny bursts of flavor that add a lot.  This bread is definitely best warm, so I'd suggesting toasting a slice for breakfast.  It was particularly good topped with homemade Meyer lemon marmalade!  Yum.  :)


Currant-Ginger Banana Bread (adapted from Joy the Baker, original recipe here)
Makes 1 loaf

1 1/4 cups all-purpose flour
1 cup uncooked quick oats
1/2 cup packed dark brown sugar
1/4 cup currants
1/2 tsp  salt
1/2 tsp baking soda
1/4 tsp baking powder
1/2 tsp ground ginger

3 large, ripe bananas, mashed
1/4 cup vegetable oil
1 large egg

2 medium egg whites, beaten to stiff peaks in a clean bowl

1. Preheat oven to 350°F.  Spray a loaf pan with oil and set aside.

2. In a large bowl, whisk together the flour, oats, brown sugar, currants, salt, baking soda, baking powder, and ginger.


3. In a smaller bowl, whisk together the mashed bananas, oil, and whole egg.  Fold into the dry ingredients until thoroughly combined.  Carefully fold in the beaten egg whites in three additions.

4. Pour batter into pan and bake until top of loaf is firm to touch and a tester comes out clean, 45 to 50 minutes. Remove from oven and allow to cool in pan for 5 minutes. Flip out and cool on a wire rack for another 10 minutes.