Saturday, August 31, 2013

Mexican Chocolate Crinkles

How did it take me so long to post these cookies?! They are amazing, so you'll want to bake them right away.  They're rich and full of chocolate (both cocoa and chocolate chips), and pretty addictive.  The cinnamon-sugar coating is really tasty and adds that special extra "something." You could add a bit of cayenne to the batter or the coating if you want to make these really live up to their name of Mexican Crinkles, but I don't like my dessert to be spicy so I skipped it.  Either way, these come highly recommended!


Mexican Chocolate Crinkles (adapted from Piece of Cake)
Makes about 3 dozen

12 ounces (2-1/4 cups) flour
1 ounces (1/2 cup) unsweetened cocoa powder
1-1/2 tsp baking powder
1/4 tsp kosher salt
4 ounces (1/2 cup) softened butter
12 ounces (1-1/2 cups) sugar
2 eggs
1 tsp vanilla extract
1 cup chocolate chips

For the topping:
2/3 cup sugar
1 T cinnamon

1. Whisk together the flour, cocoa, baking powder, and salt.  Set aside.
2. Cream together the butter and sugar.  Beat in the eggs one at a time.  Beat in the vanilla.
3. Sift the dry ingredients into the wet ingredients, and mix to combine.  Stir in the chocolate chips.
4. Cover and chill in the fridge for a couple of hours.
5. Preheat the oven to 400 degrees and line a baking sheet with parchment.  Whisk the sugar and cinnamon together in a small bowl.
6. Scoop up heaping tablespoon-fuls of the chilled dough, roll into a smooth ball, and then roll in the cinnamon-sugar.  Place on the prepared baking sheet.
7. Bake 10-12 minutes, until the tops are set and the cookies give just a little when you press the tops.  Cool on wire racks.

Wednesday, August 28, 2013

Pasta with Roasted Red Pepper-Herb Cream Sauce

First up today - the winner of my recent giveaway of The Serpent and the Pearl - Allison Macias!  Congrats, Allison - check your email for my message and send me your contact info.

Next - this fantastic pasta sauce, which I totally fell in love with.  I've been super stressed and busy with school lately, so I've been trying to focus on cooking easy dinners that don't take a ton of time or mental energy.  But, of course, I still want them to be delicious! This red pepper-cream sauce fills both requirements.  The sauce cooks in about the same amount of time as boiling pasta, so dinner is on the table quickly.  And, the sauce is total comfort food -- yum!  I love the fact that it's creamy without a ton of heavy cream, and using roasted red peppers instead of the usual tomatoes makes the sauce feel different and special without any extra work.  Don't skip the fresh herbs - they really add that fresh flavor that a pasta dish made with pantry ingredients needs.

And, the best part of this dish?  It might be that it uses a cup of white wine...so you'll have the bottle open to drink the rest with dinner!


Pasta with Roasted Red Pepper Cream Sauce (adapted from the Pioneer Woman, original recipe here)
Serves 3-4

12 ounces dry pasta
4 T butter
2 medium shallots, minced
3 garlic cloves, minced
1/2 small fennel bulb, minced
12-15 ounce jar roasted red peppers, drained and chopped
1 cup white wine
Salt and pepper
1/2 cup heavy cream
1/3 cup minced fresh parsley
1/3 cup minced fresh basil
Parmesan shavings, to serve

1. Put on a pot of water to boil, salt it generously, and then cook the pasta according to the package directions.
2. While the water is boiling/pasta is cooking, prepare the sauce.  Melt the butter in a large non-stick skillet over medium heat.  Add the shallots, garlic, and fennel and saute for 2-3 minutes until starting to soften and brown.  Add the peppers and cook for another 2-3 minutes.
3. Carefully transfer the mixture to a blender or food processor.  Let cool slightly, and then very carefully blend until fairly smooth.  Or - use a stick blender to puree the mixture even faster!
4. Return the pepper puree to the skillet and return to medium heat.  When the puree is hot, add the wine and season with salt and pepper.  Let bubble away for a couple of minutes, and then reduce heat to low and add the cream.  Stir in the cream, and heat gently, stirring often, until hot.  Remove from the heat and stir in the fresh herbs.
5. Drain the pasta well and add to the skillet with the sauce.  Stir everything together, and then serve topped with Parmesan shavings.

Monday, August 26, 2013

Roasted Summer Squash and Chickpeas with Golden Raisins and Garlic-Yogurt Sauce

This vegetarian main has quickly become one of my favorite simple summer dinners.  All the elements are just fantastic.  Tender, lemon zest-y summer squash is paired with crispy, spicy chickpeas to create the base of the dish.  Juicy golden raisins add just the perfect touch of sweetness, and a tangy, creamy yogurt sauce spiked with garlic tops everything off.  The dish feels a lot more hearty and filling than many vegetarian dishes, so you won't miss the meat at all.  And, the leftovers are delicious cold, so make sure to make extra for lunch the next day.


Roasted Summer Squash and Chickpeas with Golden Raisins and Garlic-Yogurt Sauce (adapted from The Wright Recipes, original recipe here)
Serves 2

2 large pattypan squash, halved and cut into 1/2-inch slices
Olive oil
Zest of 1 lemon, plus lemon wedges to serve
1 (15 ounce) can chickpeas, drained and rinsed
2 large garlic cloves, finely minced, divided
1/2 tsp smoked paprika
1/2 tsp cinnamon
1/2 tsp red pepper flakes (or use cayenne for a spicier dish)
Salt and pepper
1/4 cup golden raisins
7 ounces plain Greek yogurt (I used 2%)

1. Preheat the oven to 450 degrees and line a large baking sheet (or better yet, two) with foil.  Spray with oil.
2. In a large bowl, toss the squash with a couple of good glugs of olive oil and the lemon zest.  Spread in a single layer on the baking sheet.
3. In the same bowl, toss together the chickpeas with half the garlic and the paprika, cinnamon, and red pepper flakes.  Spread in a single layer on the baking sheet (or on a second sheet).
4. Generously season the squash and chickpeas with salt and pepper.  Roast 12-15 minutes, until nicely browned and tender.
5. Put the golden raisins in the bowl (no need to rinse), and set aside.
6. In a small bowl, stir together the yogurt with the remaining garlic. Season generously with salt and pepper.
7. When the squash and chickpeas are done, transfer to the bowl with the golden raisins.  Toss well to combine.
8. Serve the squash-chickpea mixture topped with the yogurt sauce and lemon wedges to squeeze over.

Thursday, August 22, 2013

Sour Cherry-Chocolate Chip Bundt Cake

I think I've mentioned on the blog that my Mom's 60th birthday was back in July, and we had a big family gathering in Ohio to celebrate.  As part of the celebration, my aunt, my sister, and I made two fantastic birthday cakes -- both of them featuring coconut and chocolate in some way, since that's what Mom loves! This is the first birthday cake, and it was my personal favorite.  I'll post my mom's favorite later this week.

Cake #1 features a delicate coconut cake filled with bright bursts of flavor from sour cherries.  If you don't have access to sour cherries, another fruit would also work well here -- sweet cherries, apricots, or raspberries come to my mind as good substitutions.  After the cake cools, a simple chocolate ganache is drizzled over top for a decadent finish.  I loved how moist and flavorful the cake was, and of course you can never go wrong by adding a little chocolate!  Definitely a great way to celebrate, especially since Bundt cakes are perfect for serving a crowd.


Sour Cherry-Chocolate Chip Bundt Cake (adapted from From My Sweet Heart, original recipe here)
Makes one cake, serving at least 8-10

2-1/2 cups flour
2 tsp baking powder
1/2 tsp salt
3/4 cup light coconut milk
1/2 cup half-and-half
2 tsp vanilla
1-1/2 sticks unsalted butter, at room temperature
1-3/4 cups sugar
3 eggs
1 cup chopped sour cherries (be sure to pit them first!), drained of excess liquid
1/2 cup mini chocolate chips
Chocolate glaze, see below

1. Preheat the oven to 350 degrees and generously butter a bundt pan.
2. Whisk together the flour, baking powder, and salt in a small bowl and set aside.
3. In another bowl, whisk together the coconut milk, half-and-half, and vanilla. Set aside.
4. In a large mixing bowl, cream together the butter and sugar until fluffy. Beat in the eggs one at a time.  Beat in the flour mixture and coconut milk mixture in alternating additions (flour-milk-flour-milk-flour).
5. Fold in the cherries and chocolate chips by hand. Pour the batter into the prepared pan.  Bake until a tester comes out clean, about 60 minutes.
6. Let cool completely before removing from the pan.  When the cake is cool, glaze with the chocolate glaze.

Chocolate Glaze

3/4 cup chocolate chips
1/2 cup heavy cream

Place the chocolate chips in a heatproof bowl.  Heat the cream in a small saucepan until steaming but not boiling, and then pour over the chocolate chips.  Let sit for a minute, and then slowly whisk until the mixture is smooth and glossy.  Let cool to room temperature, and then whisk again to make sure everything is incorporated before using.


Monday, August 19, 2013

'Borgia Style' Roasted Chicken with Pancetta and Lime (plus a Giveaway!)

Do you enjoy reading blogs devoted to historical recipes?  I haven't ventured so far as to try any of these recipes before, but I definitely love reading about the techniques and ingredients used by cooks, bakers, and chefs of the past.  A couple of my favorites are Inn at the Crossroads, a Game of Thrones blog that features medieval and modernized recipes based on dishes in the books; and Kitchen Historic, a blog by a history student who makes recipes from old cookbooks from a variety of periods.  So, I was excited to get an email about Kate Quinn's new book, The Serpent and the Pearl.  Although the book doesn't have detailed recipes in it, one of the main characters is a medieval cook and the descriptions of her food will seriously make your mouth water!  Kate was kind enough to share with me one of the medieval recipes she researched for the book and her modern interpretation.  Plus, see the end of this post for a giveaway!

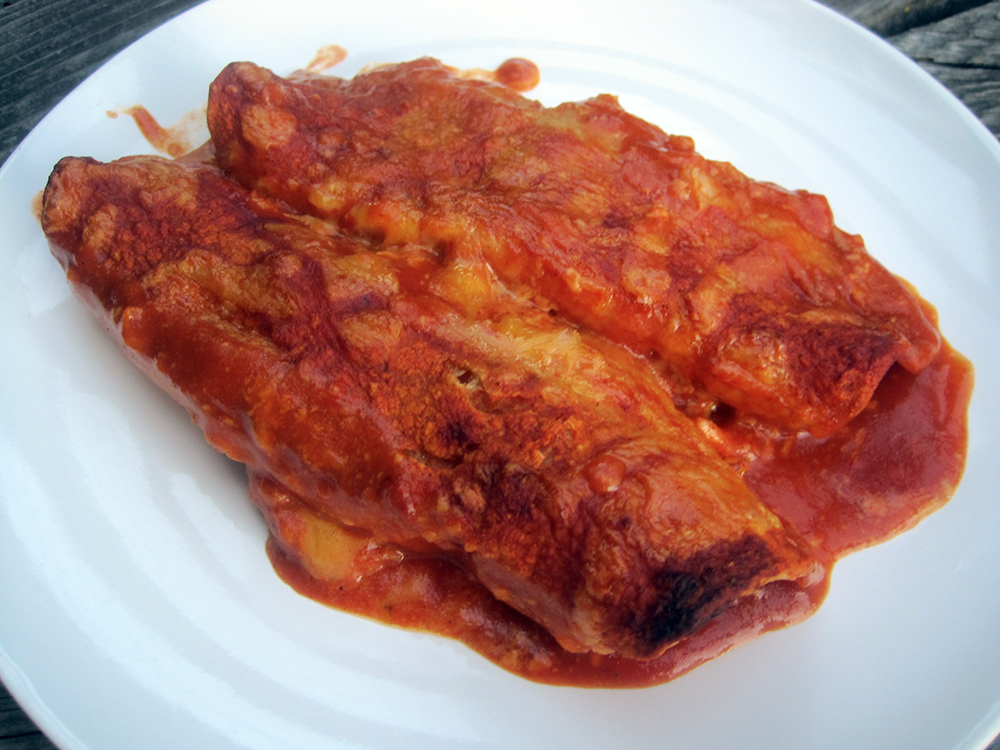
I've included below both the medieval recipe and Kate's modernized version.  I'm happy to report that the chicken was fantastic!  Sliding pancetta under the chicken skin makes it extra crisp and delicious, and keeps the chicken moist.  It did create a lot more fat in the bottom of the pan than my usual roasted chicken recipe, which spattered and made our apartment pretty smoky.  Next time, I would roast the chicken on a bed of sliced potatoes to soak up the fat and keep it contained a little better.  After cooking, the chicken gets a bright boost of flavor from lime juice.  I've only ever done chicken with lemon juice, so lime was a great change of pace and really balanced the rich pancetta and chicken skin nicely.  Yum!


Spit-roasted capon with lime

When [the capon] has been plucked and drawn, blanch it in boiling water, then take it out and stick it with fine lardoons of pork fat.  Then put it on a spit and cook it over a moderate fire at the outset; as it begins to drip, give it a sprightly fire so that the cooking will not dry it out.  If it is not larded, baste it with melted rendered fat or lard.  When it is done, serve it hot with orange juice or lime juice over it.

'Borgia Style' Roasted Chicken with Pancetta and Lime (adapted from Kate Quinn)
Serves 4

Note: This dish can also be prepared on the grill, 'beer can style,' to get more of that rotisserie feel.  I don't have a grill (ah, apartment living!), so I just roasted the chicken and basted it often.

1 large chicken
2-3 ounces thinly sliced pancetta [or, use sliced pork fat, well rinsed, if you can find it]
2 limes
Salt and pepper

1. Preheat the oven to 450 degrees and spray a baking dish with oil.
2. Gently loosen the skin of the chicken.  Slip the slices of pancetta under the skin, trying to keep it in one layer as much as possible.  Aim to cover the breasts and drumsticks.  Wrap each wing with one piece of pancetta (outside the skin).
3. Quarter one of the limes, and stuff into the cavity of the chicken.  Tie the legs together with a piece of kitchen twine.  Generously season the chicken with salt and pepper.
4. Place the chicken in the baking dish, breast side up.  Roast for 35 minutes.  Then, rotate the pan and reduce heat to 375 degrees.  Continue roasting, basting occasionally, until the until juices from the thigh run clear or when a thermometer in the thigh reads 165 degrees, about 20 to 25 minutes more.
5. Carve the chicken.  Squeeze lime juice from the second lime over the cut pieces, and season with more salt and pepper as needed.

Giveaway Time!  I received a free review copy of The Serpent and the Pearl, and I really enjoyed it. Now, I'd love to pass it along to one of you.  While I love my Nook and the convenience of ebooks, one huge benefit of paperbacks is the easy ability to share them with friends once you're done reading.  This was a great summer read, and I think anyone who enjoys historical fiction or shows like The Borgias and The Tudors would love this book.  Since I'll be mailing this myself, U.S. addresses only, please.  Just leave a comment telling me your favorite summer read if you'd like to enter!

Note: Forgot to mention this when I first posted, but I will leave the giveaway open for a week, so you have until August 26 to enter!

Wednesday, August 14, 2013

Instagram-ing my Dinner


This pizza was so good! BBQ sauce, crispy bacon, herb goat cheese, scallions, and rosemary Asiago grated on top after it came out of the oven.  Definitely a winner!  It was inspired by this awesome pizza from Confessions of a Foodie Bride.

Tuesday, August 13, 2013

Over-the-Top Oatmeal Cookies

I call these oatmeal cookies "over-the-top" because they have so many different mix-ins - in addition to the oatmeal, there's raisins, walnuts, dried cranberries, and mini chocolate chips!  All those mix-ins mean each bite will be a little different, which I happen to love.  Plus, it's a great excuse to clean out your freezer/pantry and use up those small amounts of goodies that are floating around in limbo.  The other awesome thing about these cookies is that they stay soft and moist even after they cool down.  They keep really well in an airtight container, and survived a trip to the freezer perfectly.  I made these for a big family gathering, and they were definitely a hit.  I know I was addicted, anyway...I kept sneaking extras before everyone arrived!


Over-the-Top Oatmeal Cookies (adapted from The Cookiepedia, via Leite's Culinaria)
Makes about 2-1/2 dozen

1 stick softened butter
2/3 cup brown sugar, packed
1 egg
1 tsp vanilla
3/4 cup flour
1/2 tsp baking soda
1/2 tsp salt
1/2 tsp ground cinnamon
1 cup old fashioned rolled oats
1/2 cup mini chocolate chips
1/3 cup chopped walnuts
1/4 cup raisins
1/4 cup dried cranberries

1. Preheat the oven to 350 degrees and line two baking sheets with parchment.
2. Cream together the butter and sugar, and then beat in the egg and vanilla.
3. Whisk together the flour, baking soda, salt, and cinnamon in a separate bowl.  Add to the butter-sugar mixture and then mix to combine.
4. Add the oats, chocolate chips, walnuts, raisins, and dried cranberries and stir well to make sure everything is incorporated.
5. Scoop out tablespoonfuls of the dough onto the baking sheets, and bake 11-12 minutes, rotating the cookie sheets halfway through.  Let cool on the baking sheet for a few minutes, and then transfer the cookies to wire racks to finish cooling.

Sunday, August 11, 2013

Orange-Honey-Ricotta Bites

Golden Blossom recently sent me a sample of their honey to try, and I knew right away where I wanted to start.  I had leftover ricotta cheese in the fridge from making lasagna, and I think honey combines so perfectly with ricotta - something about the earthy sweetness of honey just goes well with creamy, mild ricotta.  I had an orange in the fruit bowl, so I added orange zest and juice to the ricotta for a citrus element.  Then, I spread the ricotta on whole grain crackers and drizzled the whole thing with delicious honey. This proved to be the perfect mid-afternoon pick-me-up with tea -- a little protein, some whole grains, and a touch of sweetness to keep me going until dinner.

This recipe would be really easy to change around depending on what you have in the fridge - switch out the orange for lemon or grapefruit, or sub in goat cheese for the ricotta.  You could also make more of the topping and put it on smaller crackers or crostini for hors d'oeuvres.


Orange-Honey-Ricotta Bites
Serves 1 or 2 as a light snack

1/4 cup ricotta cheese
Zest and juice of 1/2 orange
Salt and pepper
Whole grain crackers, to serve
Good-quality honey, to drizzle

1. In a small bowl, stir together the cheese with the orange juice and zest.  Season with salt and pepper.  Taste, and adjust seasoning.
2. Spread the orange-ricotta on the crackers.  Drizzle with honey.  Eat right away!

Full disclosure: I received a complimentary sample for review purposes.  All opinions/recipe-testing are my own.

Friday, August 9, 2013

Christmas Lima Bean Salad with Cherry Tomatoes and Goat Cheese

I recently spent a couple of weeks back in Ohio visiting with my family and celebrating my Mom's 60th birthday.  We had lots of family in from out of town, which meant lots of cooking! Luckily, my mom, my aunt, and I all love to cook, so we came up with some really delicious recipes and had lots of fun!  We made tried-and-true recipes for the most part since it was a large group (including these awesome pork-and-beans tacos), but we also ventured out into new territory with this bean salad.  Giant Christmas lima beans are paired with fresh sweet corn and cherry tomatoes in this modern take on succotash.  Creamy goat cheese melts into the warm beans to create a delicious dressing, and the salad is great warm or cold.  We made a double recipe, which made a ton of salad - but, this is easy to put together, so it's a great option for a large group.  The only time consuming element is cooking the dried  beans - you need to plan ahead here, because they soak overnight and then cook for a long time (the package said an hour, but ours took more like 90 minutes).  We did the beans the day before so that cooking time was minimal on the day we were eating it.  This salad was enjoyed by everyone, and we even managed to eat it all (although it took us a couple of meals!)


Christmas Lima Bean Salad with Cherry Tomatoes and Goat Cheese (adapted from Heirloom Beans)
Serves 8

1/2 pound dried Christmas lima beans
2 T butter
3 green onions, white and pale green parts thinly sliced
1-1/2 cups fresh corn kernels (from 2 ears of corn)
Salt and pepper
1 cup halved cherry tomatoes
2 T chopped fresh mint
2-3 ounces fresh, creamy goat cheese

1. Soak the lima beans overnight (at least 8 hours), and then cook in simmering water until tender (60-90 minutes). Drain.
2. Melt the butter in a large saucepan over medium heat.  Add the green onions and saute for 2-3 minutes.  Add the corn and saute for another 2-3 minutes.  Add the beans and season to taste with salt and pepper.  Keep stirring over medium heat until the beans are heated through.
3. Toss together the cherry tomatoes, mint, and goat cheese in a large serving bowl.  Dump the hot bean mixture into the tomatoes and stir to combine - the goat cheese will melt into a lovely sauce.  Taste, and add more salt or pepper as you like.
4. Serve warm or chilled - leftovers keep well.

Tuesday, August 6, 2013

Butter Chicken Naan Pockets

There's a restaurant I love near my place called Urbann Turbann...the idea is basically Indian Chipotle...you go down the line, pick your fillings, and make a 'burrito' full of amazing Indian food, and all wrapped up in naan or chapati.  If Urbann Turbann is the perfect way to enjoy Mexican-style Indian food, then this recipe is the perfect way to enjoy Italian-style Indian food.  It's basically a calzone stuffed with delicious butter chicken!  So yummy, and also a little more portable than the usual way of serving butter chicken.  You could definitely stuff any sort of Indian food you like into these naan pockets...including leftovers.  In fact, I think this would pretty much be the perfect way to re-invigorate leftover Indian food in the fridge.


On the side: sauteed kale and fruit salad.


Butter Chicken Naan Pockets (adapted from Dinner with Julie, original recipe here)
Serves 6

For the dough:
1/2 cup warm water
2 tsp active dry yeast
1 tsp sugar
2-1/2 cups flour, plus extra for rolling out the dough
1/2 tsp salt
1/4 cup canola oil
1/3 cup plain yogurt (regular, not Greek)
1 large egg

For the filling:
Oil
2 pounds chicken breasts or thighs, cut into bite-sized pieces
One jar butter chicken sauce (we used Patak's brand)
6 thin slices Mozzarella cheese

1. Make the naan dough.  In a large bowl, stir together the water, yeast, and sugar.  Let stand for 5 minutes, until foamy (if not, throw it out and start over with fresh yeast).
2. Add the flour, salt, oil, yogurt, and egg.  Stir until the dough comes together, and then knead for a few minutes.  Cover and let rise until doubled, about one hour.
3. While the dough is rising, heat a little oil in a large skillet over medium high heat.  Cook the chicken for 7-8 minutes, until starting to brown.  Drain off any liquid in the pan, and add the sauce.  Simmer 15 minutes or so, until the chicken is cooked through and the sauce is thickened.  Let cool.
4. Divide the dough into six pieces.  On a well-floured surface, roll or pat out each piece as thinly as possible without creating holes.  (I found the dough was too wet to use a rolling pin, but I was also baking on a very humid day, so your mileage may vary.)
5. Preheat the oven to 400 degrees and line two baking sheets with parchment.  Place a dough round on one of the baking sheets.  Add a large spoonful of butter chicken, and top with a slice of cheese.  Fold over, and crimp the edges as firmly as possible - this will get a little messy, which is ok!  Cut a couple of slits in the top of the pocket with kitchen scissors.
6. Repeat with the remaining dough/chicken/cheese.  We had a little extra chicken mixture left over at the end.
7. Bake 20 minutes, until golden.  Let cool slightly before serving.

Sunday, August 4, 2013

Secret Recipe Club: Baked Egg over Veggies

My partner for this month's Secret Recipe Club was Stephanie of Ground Cherry.  Stephanie focuses both on sustainable cooking and on recipes intended for one person.  I really liked this idea, since I'm often on my own for breakfast and lunch - while cereal, leftovers, and sandwiches are always good options, sometimes it's nice to cook up something special just for myself!

This simple baked egg dish is the perfect way to transform leftovers into a new dish.  You can use whatever leftover veggies you have on hand - I know I always tend to have little bits of roasted vegetables or half a pepper in the fridge that didn't make it into dinner.  A fresh egg goes on top - as Stephanie points out in her instructions for this recipe, you really want to go for the best egg you can since the ingredients here are simple.  Luckily I made this while visiting my parents, so I scored one fresh from the farm down the road! I recommend cooking this so the yolk stays at least a little runny - once you break it with your fork, it will run all over the veggies and create a creamy sauce. This was a really delicious and filling breakfast - the only thing I would add next time is a spoonful of salsa on top!


Baked Egg over Veggies (adapted from Ground Cherry, original recipe here)
Serves 1, easily multiplied

A bit of softened butter
1/2 to 1 cup leftover veggies (I used sweet corn and green pepper)
Salt and pepper (or seasoning salt - I used one with thyme and lemon)
1 fresh egg

1. Preheat the oven to 375 degrees.  Grease a medium custard cup generously with butter.
2. Add the veggies to the custard cup, and season with salt and pepper or seasoning salt.  Carefully crack the egg over the vegetables.  Season with a bit more salt and pepper or seasoning salt.
3. Bake about 15 minutes for a softer yolk and about 20 minutes for a hard yolk (for me, it was just perfect at 17 minutes).

Saturday, August 3, 2013

Mexican-Spiced Salmon with Avocado Salsa

This was one of those random "throw things together" dinners that came out really well.  We had an avocado from our CSA that I wanted to use, and I saw some salmon at the grocery that looked tasty, so a meal was born.  To go with the avocados, I decided to do a Mexican-inspired spice rub.  The combination of chili powder and cumin makes for great flavor without being spicy or overwhelming the salmon.  And, the avocado salsa just takes this over the top.  I used basically the same ingredients that I use to make super simple guacamole, but left the avocados in chunks and added some olive oil.  The result was a tart lime sauce with lots of creamy, buttery avocado - basically, perfection! This salsa would also be great with white fish or chicken.  Plus, it's so easy!


On the side: German butterball potatoes, boiled and then sauteed in butter for a few minutes.

Mexican-Spiced Salmon with Avocado Salsa
Serves 2

1-1/2 tsp chili powder
1 tsp ground cumin
3/4 tsp kosher salt
Freshly ground black pepper
2 salmon fillets
1 avocado
Juice of 1 large lime
Olive oil

1. Preheat the oven to 450 degrees.  Line a baking sheet with foil, and spray with oil.
2. Mix together the spices.  Rub the spice mix onto the salmon, and then place on the baking sheet, skin side down.  Bake for 10-15 minutes, until cooked through (timing will depend on the size of your fillets.
3. Meanwhile, pit and peel the avocado and cut into chunks. Squeeze the lime juice over.  Add a good glug of olive oil, and season with salt and pepper.  Taste, and adjust seasoning - the salsa should be a little more tart that what you'd want to eat by itself, since it will be combined with the fish.
4. Serve the fish topped with the avocado salsa.

Thursday, August 1, 2013

Pollo Asado-Sweet Potato Enchiladas

Although I've never made real, authentic enchiladas with a sauce starting with dried chilies, they're still one of my favorite dishes.  What my enchiladas may lack in authenticity, they make up for in deliciousness!  These particular enchiladas are really easy to put together, even on a weeknight, because they start with Trader Joe's pre-seasoned pollo asado chicken. (Of course, if you don't have a TJ's near you, you could use plain chicken or you could try this marinade recipe with boneless chicken breasts or thighs.)  The chicken is paired with mashed sweet potatoes for a creamy, sweet layer, and then stuffed inside corn tortillas with gooey Cheddar cheese.  I like to use a combination of tomato sauce and jarred enchilada sauce because it's a little less spicy, but you can use all tomato sauce if you're cooking for kids or all enchilada sauce if you prefer a spicy dish.  I also use more sauce than most enchilada recipes because I like mine more on the 'casserole' side, but again, you can use less if you don't like yours so saucy.

You can see my previous enchiladas recipes here: Midwestern Enchiladas, Sweet Potato-Chicken Enchiladas with Tomatillo Sauce, Cheesy Enchiladas.


Pollo Asado-Sweet Potato Enchiladas 
Serves 4

1 pound sweet potatoes
10 small corn tortillas
12 ounce jar enchilada sauce
15 ounce can tomato sauce
12 ounces cheddar cheese, shredded

1. Bring a large pot of water to a boil.  If the sweet potatoes are large, cut into chunks (mine were small).  Add the sweet potatoes and boil until cooked through.  When cooked, drain the sweet potatoes, let cool slightly, and then peel and mash.
2. Heat a large skillet over high heat.  Add the chicken to the skillet in a single layer, and cook until nicely browned on the outside and cooked through, flipping once (about 5-6 minutes).  Let the chicken cool slightly, and then slice into small cubes.
3. Preheat the oven to 375 degrees.  Wrap the tortillas in foil and let them heat up in the oven so they will be soft enough to roll (you can also do this with a paper towel and the microwave).
4. When the oven is hot and the tortillas are warm, assemble the enchiladas.  Whisk together the enchilada sauce and tomato sauce in a large bowl.  Spray a 9x13 baking pan with oil, and spread a thin layer of the sauce over the bottom of the pan.  Fill each tortilla with a smear of sweet potatoes (about 1 T per enchilada), a couple of spoonfuls of chicken, and a sprinkle of shredded cheese.  Roll up, and place in the baking pan.  When all the enchiladas are in the pan, pour the remaining sauce over the enchiladas and spread it evenly over the top, making sure all the tortillas are covered.
5. Bake for about half an hour, until the cheese is melted and the sauce is bubbling.  Let sit for 5-10 minutes before serving.