Sunday, August 31, 2008

August Daring Bakers: Chocolate Eclairs

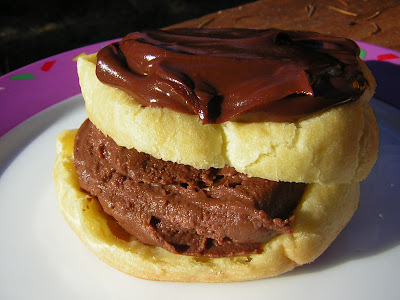
This month's challenge came from Meeta of What's for Lunch, Honey?. It was chocolate eclairs! I was excited because while I have made savory pate a choux dough for gougeres, I'd never made a sweet version before. This recipe had three components:

1. Pate a choux: This is the pastry dough, and it's really interesting because it's cooked on the stove before the oven! I had a little trouble with this component. First, my pastry tip fell out of my pastry bag while I was piping because I cut the hole too big! Oops. So I ended up more with blobs rather than long eclairs. :) Of course, they taste the same either way! Then, although they rose impressively in the oven, they ultimately deflated. I don't think the ultimate texture was right, but they were tasty!

2. Chocolate glaze: This glaze for the top of the eclairs was very complicated, but also delicious! It was also great reheated over ice cream and, whipped with a little butter and powdered sugar, an excellent icing for cupcakes! (There was lots left over, so I got to experiment with lots of different uses.)

3. Chocolate pastry cream: Possibly the food of the gods. There was also lots of this left over, but I have just been eating it plain out of the fridge like pudding! Triple yum.

Ultimately, although my eclairs didn't turn out perfectly, I did love the way they tasted and I would definitely make the chocolate glaze and pastry cream again for another use. Thanks for a great challenge, Meeta! Be sure to check out all the other cakes this month at the Daring Bakers Blogroll (link in sidebar to the right).

The recipe is available here.

Friday, August 29, 2008

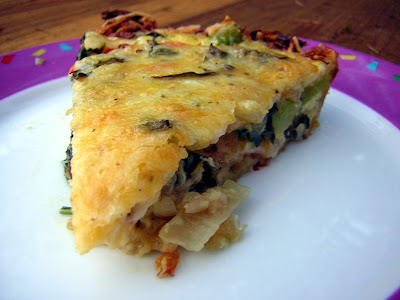
A greener version of cauliflower pie

My mom makes Mollie Katzon's cauliflower-cheese pie with grated potato crust a lot when we're all home because it's a favorite of everyone in our family, especially my sister. It's also an easy dish to play around with, as my housemate Jessie and I discovered. We had tons of leftover veggies that we wanted to use up, but we didn't want to just throw them into a random casserole--we wanted something really delicious. This pie fit the bill--lots of veggies, plus eggs and cheese to make a dish that's sort of like a quiche only heavier on the filling and lighter on the custard. The grated potato crust, though, is what makes this dish really shine--flavorful and slightly crunchy around the edges, we all agreed that we preferred it to a traditional pastry crust. Feel free to substitute whatever veggies you have around the house, or use all cauliflower for the original recipe.

Grated Potato Crust (from Mollie Katzen's Moosewood Cookbook)

2 cups grated raw potato, packed
1/2 tsp salt
1 egg, beaten
1/4 cup grated onion or finely chopped shallots

1. Preheat oven to 400 degrees.
2. Set the potatoes in a colander and sprinkle the salt on top. Let sit ten minutes, then squeeze out the excess water and add to the remaining crust ingredients. Pat into an oiled 9-inch pie plate, patting the potatoes up the sides to create a crust.
3. Bake 30 minutes, then brush the crust with oil to help it crisp and return to the oven for a further 10-15 minutes.

Veggie-Cheese Pie (inspired by Mollie Katzen's Moosewood Cookbook)

3 T butter
1 cup chopped onion
1 medium clove garlic, minced
1/2 bell pepper, chopped
1 small head broccoli, cut into florets
2 large handfuls baby spinach
A few thin slices pancetta or another cured meat
1 - 1 1/2 heaping cups shredded cheese (we used a "Mexican blend"; cheddar would also be great)
Fresh basil
2 eggs
1/4 cup milk
A dash of dried thyme
Salt and pepper, to taste

1. Melt the butter in a large saucepan. Add the onions and saute for a minute or two. Add the garlic and bell pepper, and saute until everything is nice and soft. Dump in the broccoli and mix well, then cover the saucepan and cook until the broccoli is barely tender, stirring occasionally. Add the spinach in two batches, cooking until wilted.

2. Cover the bottom of the potato crust with a thin layer of pancetta. Top with half the cheese, followed by the veggies. Roughly chop the basil and scatter over the veggies, then add the remaining cheese.

3. Make the custard: Whisk together the eggs, milk, thyme, salt, and pepper. Carefully pour over the pie. Because there's not much custard, take care to try and pour evenly so that all parts of the pie get some egg.

4. Bake the pie at 375 degrees until set, about 30-40 minutes. After taking it out of the oven, let the pie sit at room temperature for about 5 minutes before slicing and serving.

Wednesday, August 27, 2008

Quesadillas with Potato and Mustard Greens

This recipe is loosely based on this quesadilla recipe from Bon Appetit, with the same ingredients but a somewhat different preparation. I used leftover potato latkes in place of the potatoes in the original recipe because we had some; if you don't you'll likely want to use the suggested preparation or perhaps cook up some frozen hash browns. I also changed the method for using the mustard greens--pulling out the food processor for quick quesadillas seemed like way too much work! I just sauteed them in a bit of oil and loved the result. These quesadillas are unusual but delicious, with lots of different but complementary flavors going on. Yum!

Quesadillas with Potato and Mustard Greens (based on this recipe from Bon Appetit)
Note: I'm not listing too many amounts here because it's really all to taste--just use however much you would like!

Leftover potato pancakes
Chili powder
Olive oil
Chopped and stemmed mustard greens (from 1 bunch)
Salt and pepper
Goat cheese (I used a firmer goat cheese rather than the crumbly type, but any would be fine)
Tomatillo salsa
Monterey Jack cheese
Flour tortillas

1. Crumble the potato pancakes in a small bowl and add chili powder to taste. Heat in a nonstick pan for a couple of minutes until warmed through. Return to the bowl and set aside.

2. Heat a little olive oil in the pan until shimmering. Add the mustard greens plus salt and pepper to taste. Saute for just a couple of minutes until the greens are beginning to wilt. Remove from heat and set aside.

3. On one flour tortilla, spread a layer of potatoes, followed by a layer of greens. (Try to space it out so you have the same amount for each quesadilla you're making!) Top with slices of goat cheese, tomatillo salsa, and grated Monterey Jack cheese. Place in a hot non-stick skillet (with no oil) and heat until the cheese begins to melt and the bottom of the quesadilla is well browned. Top with another flour tortilla and flip over to brown the remaining side. Repeat to make more quesadillas.

I'm sending this recipe off to BSI: Potatoes!

Tuesday, August 26, 2008

Apricot Custard Tart

The only downside of this recipe is that everyone thought the apricots looked like egg yolks! Other that that, the tart was really delicious...sweet custard with slightly tart apricots and a melt-in-your-mouth crust (I love this tart dough!). This would be delicious with most any fruit, and it is fairly easy, though you do need to plan ahead with making the crust. But after the crust is made, you just arrange the fruit and pour a simple custard on top! Yum. :)


Apricot Custard Tart (based on "Alsatian Apple Tart" in Baking from My Home to Yours)
Note: You can also easily make this in a pie plate if you haven't got a tart pan handy (mine was in the mail from Amazon when I was making this!)

1 pound ripe apricots (about 8 medium)
1 9-inch tart shell made with Sweet Tart Dough with Nuts, partially baked and cooled
3/4 cup heavy cream
6 T sugar
1 large egg
1 large egg yolk
3/4 tsp pure vanilla extract

1. Preheat the oven to 375 degrees. Set tart pan with partially baked crust on a baking sheet.
2. Halve and pit the apricts. Set them into the tart shell, trying to space them evenly and fit them fairly close together.
3. In a 1-quart measuring cup or small bowl, whisk together the cream, sugar, egg, yolk, and vanilla. Pour over the apricots.
4. Bake 50-55 minutes, or until the custard is set. A knife inserted into the custard in the center of the tart should come out clean. Cool to room temperature or a little warmer before serving.

Sweet Tart Dough with Nuts: Use the recipe here, but skip step 4 (that is, don't put the tart back into the oven after the initial 25 minutes). If you want to use regular Sweet Tart Dough, just replace the ground almonds with an equal amount of flour.

Saturday, August 23, 2008

What to do with leftover polenta


If you decided to make a full recipe of pesto polenta for this caramelized onion-bacon tart, you'll no doubt have some leftover. Stick it in a tupperware, smooth the top, and chill in the fridge at least overnight. While there are lots of things to do with it at this point, here's one idea:

Slice and fry pieces of polenta (I like mine bite-size, but any size will work as long as they're thin enough to warm through before the outside burns). Top with a quick veggie saute...I just used veggies from around the house that needed to be used up, and lots of combinations would work. I sauteed half an onion until soft, seasoned with salt and pepper, then added some cherry tomatoes and zucchini. When the veggies started to soften, I added a splash of cream and continued to cook until the tomatoes were squishable. To finish, I added a splash of balsamic vinegar and some fresh thyme from the garden in the last couple minutes of cooking.

Another great option is to top fried polenta with leftover chili or another stew.

Wednesday, August 20, 2008

Caramelized Onion-Bacon Tart

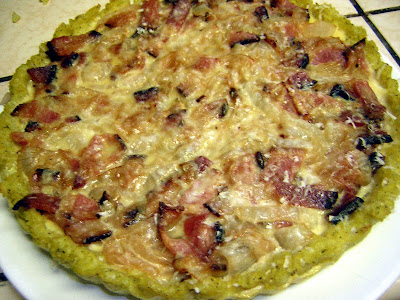
This tart is super delicious--bacon, cheese, caramelized onions...what's not to love? It's also a fun variation on a quiche because although it has an egg component, the ratio of eggs to filling is much smaller than in a quiche recipe...so you end up with lots more filling. The crust is also really unique. It's a pesto-polenta crust made by preparing polenta, stirring in some pesto, and then pressing it into a 9-inch tart pan. Although it requires a little more "hands-on" time than a traditional pastry crust, the polenta crust contributes excellent flavor and a great texture. You can also throw in some veggies if you like--I like little cubes of zucchini sauteed in a little olive oil. Just keep all your ingredients fairly small so that it's easy to cut the slices.

Caramelized Onion-Bacon Tart (inspired by recipes at Eating Out Loud and Food Stories)

Pesto-Polenta Crust:
6 cups water
1 tsp salt
2 cups polenta
3 T butter
1/4 cup prepared pesto
Freshly ground black pepper

Filling:
8 slices bacon
1 large yellow onion
1 clove garlic, minced
2 eggs
A splash of milk
A generous handful of grated Gruyere cheese
Freshly grated black pepper and/or other seasonings (I liked the Greek Seasoning from my Tastes Like Home partner)
Grated Parmesan cheese, to garnish

1. Prepare the crust: Bring the water and salt to a boil in a large pot. Stir in the polenta and reduce to a simmer. Stir with a wooden spoon and keep on stirring for 15-30 minutes...you want to stir until the polenta gets thick enough that it's quite hard to stir. (The original recipe said 30 minutes but I found that 15 worked just fine...but don't go any lower.)
2. Once the polenta is nice and thick, scrape it out onto a large piece of aluminum foil. Allow to cool slightly, then scrape into a large bowl. Stir in 1/4 cup prepared pesto and lots of freshly ground black pepper. Spread the polenta back onto the foil and let cool until it just starts to set but is still "mold-able". Press polenta into a 9-inch tart pan with a removable bottom to make a crust about 1/4-inch thick. You'll use about half the polenta--so you can start with a half recipe or save the extra for another use (recipe to come tomorrow!) To save polenta, just scrape into a tupperware and press down to fit the container; chill until ready to use.
3. Bake the polenta crust at 350 degrees for 10 minutes.
4. While the crust cools, make the filling: Cover a baking sheet with aluminum foil and then lay the bacon out in one layer. Cook at 400 degrees until nice and crispy. Then cut into nice bite-sized pieces and let drain on paper towels.
5. Meanwhile, thinly slice the onion and cook over medium-low heat with a bit of olive oil until soft and browned. Add the minced garlic and continue to cook until everything is nicely caramelized.
6. In a medium bowl, whisk together eggs and milk. Add the bacon, onion, Gruyere cheese, and lots of freshly ground black pepper; mix well. Pour the filling into the crust and top with grated Parmesan cheese. Bake at 350 degrees until the center is set. After baking, the tart should be easy to pop out of the tart pan to serve.

Monday, August 18, 2008

Berry-Brioche Bread Pudding

Bread pudding is a great use for day-old bread that you want to use up. In this case, I had lots of brioche crusts from cutting out circles for my venison sliders. I paired the brioche with lots of fresh raspberries and blueberries for a lovely summer bread pudding. I've made bread pudding with various recipes over the years; this one is richer than I normally go, and it ends up very moist and custardy. Yum!


Berry-Brioche Bread Pudding (inspired by Fine Cooking)

10 cups day-old brioche
7 large egg yolks
3 large eggs
1 cup sugar
1 tsp table salt
6 cups half-and-half
1/2 vanilla bean
1 pint blueberries
1 pint raspberries

1. Cube the day-old brioche and place in a large bowl. Set aside. In another large bowl, whisk together the yolks and whole eggs with the sugar and salt until thoroughly combined. Set aside.

2. Pour the half-and-half into a medium saucepan. Cut the half vanilla bean in half lengthwise and scrape the seeds into the saucepan along with the scraped bean. Heat over medium high until steaming but not bubbling.

3. Slowly whisk the hot half-and-half into the egg mixture until thoroughly combined. Strain over the bread cubes. Press down on the bread with a wooden spoon to make sure it is as submerged in the custard as possible. Allow the custard to cool to room temperature for a couple of hours, then gently fold in the berries.

4. Preheat the oven to 325 degrees. Spray a 9x13 baking dish with oil and then pour the bread-custard-berry mixture into the baking dish. Cover loosely with foil, place the baking dish on a heavy baking sheet to catch drips, and then carefully transfer the pudding to the oven. Bake for 70 minutes, then remove the foil and bake for a further 20-40 minutes until the bread pudding is well browned and no liquid custard appears when the pudding is pierced in the middle with a knife.

Sunday, August 17, 2008

Tastes Like Home!

Megan of Megan's Cookin created an awesome blog event in which bloggers from lots of places exchange local treats by mail. For instance, I'm from Berkeley, CA and so one of the things I sent was some jam from the local Frog Hollow Farms. I had such a fun time scouting out local foods at our farmer's market and local grocery! But it was even more fun to get my own box in the mail! My partner was Glenna of A Fridge Full of Food, and she mailed me some delightful Missouri goodies...Missouri black walnuts from Hammons (Stockton), Cavender's Seasoning (Harrison, AR), Silver Dollar City (Branson) BBQ sauce made by Ott's (Carthage), and Hallam's sorghum (Ozark) (her descriptions). Yum! I had never even had three of the things before (with the obvious exception of walnuts!), so it was really a treat to be able to get new things to try. And I love walnuts, so it's cool to get them straight from the source! I may try them in my next batch of rugelach (recipe coming soon). The BBQ sauce I'm saving for when my BBQ-loving housemate gets back from Thailand...I can't wait! Look for these goodies to pop up again in the next few months on my blog...

Here is my somewhat failed photo...everything just wouldn't fit into the shot!!

Friday, August 15, 2008

Elizabeth Falkner's Chocolate Chunk Cookies

These have to be some of my favorite chocolate chip cookies! I found them because they were recommended by Joy the Baker, and she's right that they're fantastic! They're buttery, nice and crisp on the outside yet soft in the middle. They also have a nice kick of salt--make sure to use kosher, or reduce the amount if using table salt. The only change I made to the recipe was to use vanilla sugar in place of the granulated sugar, and then omit the vanilla extract...this worked fine and I don't think it changed the final product. Falkner also suggests adding nuts, which I'm sure would be very tasty!

Chocolate Chunk Cookies (from Elizabeth Falkner's Demolition Desserts)

8 Tablespoons butter, softened
3/4 cup firmly packed brown sugar
1/2 cup plus 1 T granulated sugar
1 large egg
1 teaspoon vanilla extract
1 teaspoon kosher salt
1 1/4 cup plus 3 Tablespoons all-purpose flour
1/2 teaspoon baking soda
1/4 teaspoon baking powder
8 ounces bittersweet chocolate, chopped

1. Cream together the butter and the sugars until smooth. Add the egg, vanilla, and salt and stir to combine. Sift in the flour, baking soda, and baking powder and gently stir to combine. Add the chocolate and stir it in. Cover the bowl and chill at least 30 minutes in the refrigerator.

2. Preheat the oven to 350 degrees. Roll the dough into 1-inch balls and place 2 inches apart on lined baking sheets (I use tin foil, although parchment might be better). Bake cookies for 13-17 minutes until nicely browned but still soft in the middle. 13 minutes will make a softer cookie, while 17 minutes will make a crisper cookie.

Wednesday, August 13, 2008

Dorie's Classic Brownies

Wow, these are some of the fudgiest, most delicious brownies I've ever had! I won't say they're the best ever because that honor goes to my friends Kristi and Lauren in Seattle, who once mailed me what were truly the most amazing brownies I have ever eaten. But these are a pretty good substitute if you haven't got one of them in your kitchen! They're great both warm out of the pan and cold from the fridge later. These are the perfect brownie to eat with ice cream--deep, dark, rich chocolate in brownie form.

Dorie's Classic Brownies (from Baking from My Home to Yours)

5 T unsalted butter in 5 pieces
4 ounces bittersweet chocolate, chopped
2 ounces unsweetened chocolate, chopped
3/4 cup sugar
2 large eggs
1 tsp vanilla
1/2 tsp instant espresso powder
1/2 tsp salt
1/3 cup flour
1/2-1 cup chopped nuts (recipe suggests walnuts; we used almonds)

1. Preheat oven to 325 degrees. Line an 8-inch square pan with foil and butter.
2. In the top of a double boiler, melt together the butter and both chocolates. Just as soon as everything is melted, remove from heat.
3. Whisk in the sugar, and then the eggs one at a time. Add vanilla and whisk ingredients briskly before gently stirring in the espresso powder. Stir in the salt and flour just until incorporated. Fold in the nuts with a rubber spatula.
4. Scrape batter into pan and smooth the top. Bake 30-33 minutes until the top is dull. Or go a little less for even fudgier brownies (I like mine a bit underdone).

Tuesday, August 12, 2008

Carnitas Manwich Nachos!

What do you do with leftover carnitas? Make Manwich Nachos, of course! My dad really invented these when I was last visiting, by putting regular Sloppy Joes over tortilla chips with cheese. My mom then had the brainstorm to mix our leftover carnitas with Manwich sauce. This is really easy to pull together, either with leftover carnitas or with ground turkey. Just warm up the meat (or cook, in the case of the turkey) with a can of Manwich. Then pour over tortilla chips and top with grated cheese and scallions. Enjoy!

Monday, August 11, 2008

Two Kinds of Tacos: Carnitas and Braised Greens

Both of these taco fillings are delicious, both separately and together. The carnitas is one of my absolute favorite taco fillings--crispy yet moist, flavorful, and spicy. The braised greens are also terrific, and provide a great option if you have vegetarians in the mix...plus, they're tasty enough for everyone to enjoy. Although they seem like an unusual taco filling (to me, at least), Rick Bayless writes that they're actually traditional! Be sure to have plenty of fixings to go around--tomatoes, sour cream, cheese, rice, guacamole, and anything else you like for topping tacos.

For a truly tasty taco, save the liquid from making the carnitas--we used it to make rice, and it resulted in rice that was quite spicy and totally delicious. It's a great use for a flavorful liquid that you might otherwise toss, and it really adds something great to the tacos.

Finally, I think these tacos are great for a picnics and outdoor eating--but only if the location is close by. We had these for our 4th of July picnic in Ohio, but that was just in our backyard. People were able to load up their plates with tacos and sides inside, and then eat out back. These probably have too many components to be worth it for packing up and taking to another location (plus it would be hard to keep everything hot). But, I definitely recommend these tacos for backyard picnics!

Carnitas (from Hot Sauce Blog, recipe here, easily halved)

7 pounds pork butt or boneless pork country ribs
1 very large onion, quartered
5 chipotles in adobo, seeded and chopped
3 T adobo sauce from the chipotles
1 T cumin
1 T coriander
1 T oregano
1 T salt
2 bay leaves
2-3 quarts low sodium chicken broth
2 T vegetable oil

1. Cut the pork into 10 large chunks and place in a large stockpot or Dutch oven. Add all the remaining ingredients except for the vegetable oil. Add more stock as needed to cover the pork. Cover and bring to a boil, then reduce the heat and simmer uncovered for about 3 hours, until the meat easily pulls apart with a fork. Remove pork to a platter, let cool slightly, and then cut into 1-inch chunks. Don't remove any pieces of fat--they will render in the next step and make everything more delicious.

2. Preheat oven to 450 degrees. Coat a large baking dish with the vegetable oil and then add the pork. Toss gently, and then roast in the oven uncovered for about 30 minutes, until sizzling and crispy.

Braised Greens (from Rick Bayless's Everyday Mexican)

1 12 ounce bunch Swiss chard, washed (or collard greens, kale, etc.), sliced crosswise into 1/2 inch slices
1 1/2 T vegetable oil
1 large white or red onion, sliced 1/4 inch thick
3 garlic cloves, minced
1 tsp red pepper flakes
1/2 cup chicken or vegetable broth, or water
Salt and pepper

1. Heat the oil over medium high heat in a large pan. Cook onion until brown but not completely soft, 4-5 minutes.

2. Add garlic and red pepper flakes to the onions and cook 1 minute. Add the chicken broth, a generous pinch of salt, and the greens. Reduce heat to low and braise, covered, for about 5 minutes, until greens are barely tender but not quite done.

3. Remove cover from greens and cook until the moisture is mostly evaporated. Season to taste with salt and pepper.

And here are the awesome patriotic star cookies we made for dessert...yum! They're just this Christmas cookie recipe for rolled sugar cookies with 4th of July shapes and colors.

Saturday, August 9, 2008

Spicy Chipotle Bean Dip

This black bean dip is spicy, flavorful, and perfect for a big group. The chipotles add a smoky note, and all the flavors meld together well. I made a half-recipe and it was plenty for our group of 9 (which included 2 kids), but as part of a meal rather than as a separate snack. I listed the full recipe below in case you're cooking for a crowd or want to serve this on its own. My mom and I included this dip as part of our 4th of July picnic, which was Mexican themed and lots of fun. Coming up later this week are our awesome tacos from that same meal--carnitas for meat-eaters and braised greens for veggies/everyone.

Spicy Chipotle Bean Dip (from Fine Cooking)

Cooking spray/oil
2 T olive oil
2 medium tomatoes, cored and cut into medium dice
2 tsp. kosher salt
1 large yellow onion, finely diced
3 large cloves garlic, minced
1 T chili powder
2 15-1/2 oz. cans black beans, rinsed and drained well
2 canned chipotles en adobo, minced (about 1 T)
3 T adobo sauce from the canned chipotles
3 T cider vinegar
1-1/2 cups fresh or frozen corn kernels (no need to thaw)
1-1/2 cups (6 oz.) grated sharp cheddar cheese
1-1/2 cups (6 oz.) grated Monterey Jack cheese
3/4 cup chopped fresh cilantro
Freshly ground black pepper
Tortilla chips for serving

1. Preheat the oven to 425 degrees and spray a 1 1/2 quart baking dish with oil and place on a baking sheet lined with oil.
2. Put the tomatoes into a colander, sprinkle with 1 tsp salt, and set aside.
3. Heat 2 T olive oil in a large skillet over medium-high heat until it shimmers. Reduce heat to medium and add the onion and 1 tsp salt. Cooking, stirring often, until soft and translucent, about 4-6 minutes. Add garlic and chili powder and cook, stirring, for 1 minute. Add half the black beans, the chipotles and adobo sauce, and 3/4 cup water. Bring to a boil. Cook until liquid reduces by half, 2-3 minutes.
4. Transfer bean mixture to a food processor, add the vinegar, and process until smooth. Or, transfer to a large bowl, add vinegar, and mash well with a potato masher. Let cool a few minutes, then add the reserved beans, the tomatoes, corn, half of each type of cheese, and 1/2 cup cilantro. Mix well and season to taste with salt and pepper.
5. Transfer bean dip to the baking dish and sprinkle with the remaining cheese. Bake until the cheese melts and browns around the edges, about 15 minutes. Sprinkle on the remaining cilantro and serve with tortilla chips for dipping.

Friday, August 8, 2008

Blue Cheese-Bacon Potato Salad

This is an awesome potato salad recipe that my housemate Jessie has made for a couple of our recent barbecues. It's a nice change from the ordinary, while still being creamy and delicious. The blue cheese and buttermilk give the potato salad a great tang, and we all know that bacon makes everything better. ;)


Blue Cheese-Bacon Potato Salad (from Martha Stewart Living)

1 1/2 pounds red-skin potatoes, scrubbed clean
3 T coarse salt
1 1/2 ounces blue cheese, plus more for garnish
1/2 cup buttermilk
1 tsp red wine vinegar
1 tsp Dijon mustard
1 T minced fresh chives, plus 1 tsp for garnish
8 bacon strips, cooked until crisp, and crumbled

1. Place potatoes and salt in a medium saucepan. Cover with water and bring to a simmer. Cook until a knife pierces through potatoes with little resistance, about 12 minutes. Drain and let cool slightly. Halve potatoes.

2. Meanwhile, mix blue cheese (feel free to use a larger amount if desired), buttermilk, vinegar, and mustard in a bowl until well combined.

3. Combine still-warm potatoes, dressing, chives, and almost all the bacon in a large bowl. Garnish with blue cheese, chives, and remaining bacon.

Wednesday, August 6, 2008

Cracked Wheat Beer Bread

I particularly enjoyed this bread toasted with jam and in a sandwich with mustard, goat brie, and fried egg. Mmmmm... The beer flavor comes through pretty well, but the bread is still good in both savory and breakfast applications. This is a great "everyday" loaf for sandwiches and such, plus the addition of whole wheat and cracked wheat makes it feel a bit healthier.


Link to the recipe is here; I didn't change a thing except adding an egg wash and a sprinkle of sesame seeds. It's totally worth it to hunt down that vital wheat gluten--it makes the whole wheat bread really light.

Tuesday, August 5, 2008

Nectarine-Arugula Pizza

One of my favorite pizza places in Berkeley is the Cheeseboard, which serves only one kind of pizza each day--always something different, creative, and delicious! They're currently in a two-week vacation, but on the last day of pizza, we picked up some truly amazing slices--"Fresh Peaches and Nectarines, Mozzarella Cheese, Ricotta Salata, Arugula w/ Vinaigrette." They were so tasty that my housemate Jessie and I wanted to recreate this pizza at home. Jessie was the chef on this one; I just helped with inspiration. ;)

To make this pizza, start with a base of Martha Stewart's pizza dough. When it's ready to go, top with olive oil, goat cheese, thinly sliced nectarines, cubed goat cheese, caramelized onions, sauteed arugula, and a bit of mozzarella. Yum!

Check out more dishes featuring fruits and veggies at Sweetnicks' ARF/5-A-Day Tuesday Roundup.

Monday, August 4, 2008

Top Chef Venison

I recently got invited by some friends to participate in Top Chef Venison! What fun! I had never cooked venison before (or even eaten it), but I'm always up for a challenge. After some research online, I decided to create venison sliders--mini burgers because of course we were each creating only a tasting portion. This recipe makes tasting portions for about 10 and would probably make dinner for 4ish.

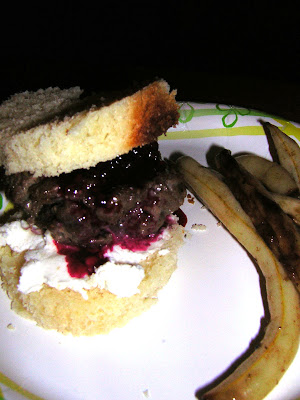
I added shallots and plain yogurt to the sliders to make them moist, and cooked them in LOTS of butter. This resulted in a juicy burger despite the fact that venison itself is pretty lean. I complemented the flavor with goat cheese for richness and a tart blackberry compote for sweetness and tang. The sliders were surrounded by homemade brioche circles--rich and probably a little soft to stand up to the wet toppings, but tasty nonetheless. I made balsamic wax beans on the side.

And...the result? Despite lots of truly amazing dishes, I ended up winning! Very exciting but most of all just a really fun evening with friends and tons of good food. I was also delighted to enjoy venison since I'd never had it before--wonderful flavor and everyone really showed it in its best light! This was a great way to see all the awesome ways to feature venison in different dishes and different cuisines. Hopefully I can finagle some more someday. :) Unfortunately I didn't get a great shot because I didn't want to interrupt everything for ten minutes, but here's the best I managed:

Venison Sliders with Goat Cheese and Blackberry Compote on Brioche

1 lb. ground venison, Italian flavor
1/4 cup very finely diced shallots
2 T plain Greek yogurt
Salt and pepper
4 T unsalted butter
Goat Cheese (choose something really creamy)
Blackberry Compote
Brioche

Gently mix together the venison, shallots, yogurt, salt, and pepper with your hands. Shape into 10-12 small patties. Heat butter over medium heat until melted (you may want to use two skillets or do this in batches). When the butter is melted, add the burgers and cook on both sides until well done. You may need to turn the heat down to medium-low to get the inside fully cooked.

To serve, cut the brioche into slices and then cut out circles about the size of the sliders with a biscuit or cookie cutter. Spread half the rounds with a thin layer of goat cheese. Top with a slider, a generous drizzle of blackberry compote, and another brioche round. Serve immediately.

Blackberry Compote

1/2 pint blackberries
Sugar, to taste
Balsamic vinegar, to taste

Heat half the blackberries in a small saucepan until soft. Mash with a potato masher and then force through a sieve into another small saucepan. Simmer the liquid until slightly reduced and thickened (about 7 minutes). Add a few good pinches of sugar and stir until dissolved.

Remove from heat and add the remaining blackberries. Stir well, and crush them slightly with your spoon (but don't turn them into a puree!). Add a splash of balsamic vinegar, stir, and taste again. How much sugar/vinegar you add will depend on your taste and the sweetness of the berries you use; just remember that this is a savory sauce rather than an ice cream topper, so you don't want to get it too sweet!

Brioche

I used Dorie's recipe, linked here (though this time I did it with a stand mixer--much easier!)

Balsamic Wax Beans

1 pound wax beans
Olive oil
Salt and pepper
Balsamic vinegar

Wash and trim the beans. Heat a large skillet over high heat. Add the oil and heat until shimmering. Add the beans, season with salt and pepper, and cook over high heat until they begin to brown and blister. Turn down the heat and cover, cooking until the beans just start to become tender. Remove the lid, turn up the heat a bit, and add a generous splash of balsamic vinegar. Saute the beans until very tender and caramelized. Taste and adjust for salt, pepper, and vinegar.

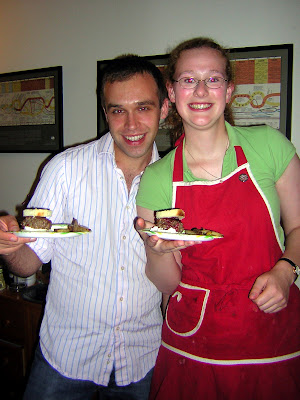
Here I am with my friend Peter and our tasting portions!

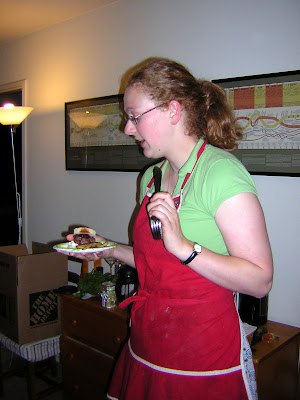
This is me describing the dish to all the judges and other chefs.

Friday, August 1, 2008

Ricotta-Spinach Calzones

These calzones are absolutely delicious, with a moist, flavorful filling and a tender crust. Compared to the original recipe, my main changes were to reduce the amount of filling by half (Mollie Katzen must have been on crack if she thought a full recipe of filling would fit into that amount of dough!) and to add in some pepperonis (to the originally vegetarian recipe). With or without the pepperoni, this recipe is a winner. I'd suggest serving with marinara sauce for dipping.

Also be sure to check out other awesome yeast-y delights at YeastSpotting over at Wild Yeast.

Ricotta-Spinach Calzones (from Mollie Katzen’s Moosewood Cookbook)

Makes 6 calzones (enough for 6 regular eaters or 3 big eaters)

Dough

1 ½ tsp dry yeast

1 T honey

1 cup warm water

1 ½ tsp salt

2 ½-3 cups flour (mix whole wheat and white, or just white)

Soften together the yeast, honey, and water for 5-10 minutes until the yeast bubbles up. Add the salt and flour, then knead 10-15 minutes (by hand, or less if using a stand mixer). Cover, and set in a warm place to rise until doubled in bulk, about 1 hour.

Prepare the filling while the dough rises:

½ pound fresh spinach

2 T butter, very soft

1 clove minced garlic

¼ cup minced onion

½ pound ricotta cheese

1 packed cup grated mozzarella

¼ cup grated parmesan

Dash nutmeg

Salt and pepper

Several pepperonis (optional)

1. Wash, stem, and finely chop the spinach. Steam it quickly over medium high heat, adding no additional water. When wilted and deep green, it is done and should be removed to a mixing bowl with a slotted spoon.

2. Saute the garlic and onion in half the butter (1 T) until translucent and soft. Add to the bowl with the spinach. Add the cheeses, nutmeg, and remaining 1 T butter and mix well. Add salt and pepper to taste. Reserve pepperonis for the next step.

Make the calzones:

1. Preheat the oven to 450 degrees. Punch down the dough. Divide into six sections and roll or press out into rounds about ¼-inch thick. Fill each with ½ - ¾ cup filling, placing the filling on half of the circle and leaving a ½-inch rim. Tuck in a few pepperonis, if desired. Moisten the rim with water, fold the empty side over, and crimp the edge well with a fork. Prick the top 2-3 times.

2. Bake the calzones on oiled trays for 15-20 minutes, until crisp and lightly-browned.

3. If desired, serve with good marinara or meat sauce for dipping.