Friday, June 27, 2014

Pineapple-Pork Sliders

I love using the slow cooker in the summer -- it keeps the kitchen cool and makes big batches so I'm sure to have leftovers.  These Hawaiian-inspired pork sliders require a bit more work than some slow cooker recipes, as the meat needs to be crisped up in the oven before serving (similar to carnitas), but the results are well worth the extra effort.  The pork is super juicy and flavorful, and is out of this world when paired with fresh pineapple.  You can grill the pineapple if you like, but we found it was so tasty fresh that we didn't bother.  Pair the sandwiches with slaw or salad to balance out the richness of the pork.


Pineapple-Pork Sliders (adapted from Pinch of Yum, original recipe here)

2-3 pounds pork shoulder, butt, or country-style ribs
2 cloves garlic, minced
1 red onion, diced
2 bell peppers, diced
1 jalapeno, diced
1 cup pineapple juice
1/2 cup soy sauce
Small buns, toasted
Fresh pineapple, thinly sliced

1. Place the pork, garlic, onion, peppers, jalapeno, pineapple juice, and soy sauce in a slow cooker.  Cover and cook for 4-5 hours on high or 7-8 hours on low.
2. Line a baking sheet with foil and preheat the oven to 450 degrees.
3. Carefully transfer the pork to the baking sheet, letting the juices run back into the slow cooker.  Remove any bone(s) and large pieces of fat, and break up or shred the pork into bite-sized pieces.  Arrange the shredded meat in an even layer, and then cook for about 15 minutes, until the meat is starting to get a little crispy.
4. Strain the liquid in the slow cooker into a bowl or pot.  When you remove the pork from the oven, stir in as much as you like to moisten the meat.  You can also spoon some over each individual sandwich if you like.
5. Assemble your sandwiches.  Pile the pork on toasted buns and top with thinly sliced fresh pineapple.

Tuesday, June 24, 2014

Ginger-Mint Iced Green Tea

Here's another great hot-weather beverage that is guaranteed to cool you off.  I love making regular tea a little fancier with fresh mint and ginger.  Since I often end up with fresh herbs or fresh ginger leftover from other recipes, this is a great way to use them up before they go bad.  Fresh thyme, lemongrass, or sage would also work well.  I've found that having a pitcher of iced tea in the fridge makes me a lot happier when I get home in the evening, and it's really easy to make.  I'll be making variations on this recipe throughout the summer!


Ginger-Mint Iced Green Tea (adapted from Steamy Kitchen, original recipe here)
Makes about 4 cups, easily multiplied

2 bags green tea
2-inch piece of ginger, peeled and minced
2-3 sprigs mint, leaves coarsely chopped
4-1/2 cups boiling water
1-2 tsp sugar (as desired)

Combine the tea bags, ginger, and mint in a glass container.  Pour the boiling water over.  Steep 3-4 minutes, and then remove the tea bags.  Stir in the sugar, and let steep another 10 minutes or so.  Strain into a pitcher.  Chill until cold, and then server over ice.

Saturday, June 21, 2014

Dal Makhani and Coconut-Sesame Green Beans

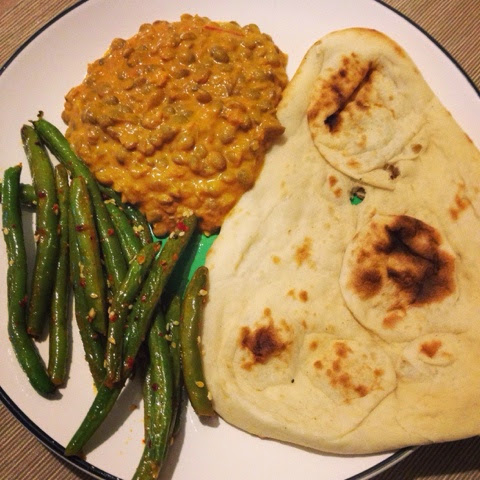
This Indian meal turned out really well.  I was a little skeptical about the dal recipe because it didn't have a ton of different spices (which I tend to associate with Indian food!), but the flavor was amazing.  I guess half a stick of butter plus heavy cream will do that for you.  :)  The lentils smell so good while they're cooking, and overall they're just creamy and delicious.  I used one teaspoon of cayenne, which made them pretty spicy -- use less if you want a milder dish.

On the side are spicy coconut green beans.  Again, you can use less chile if you want a milder dish.  I loved the idea of tossing green beans with coconut milk -- it added a subtle coconut flavor that made for a simple and tasty side dish.  I don't think they're technically an Indian dish, but they went perfectly with the dal.  Don't forget naan or rice as well -- we had Trader Joe's frozen naan, which is quick and really yummy.

Overall, you'll want to plan ahead a bit with this meal, since the dal takes about an hour and fifteen minutes to cook.  But, most of that time it's just cooking -- you don't need to do much other than occasionally stirring to make sure the bottom doesn't burn.  This is definitely a meal I will be making again!


Dal Makhani (adapted from Nirvana Restaurant, via Steamy Kitchen)
Serves 4

1 cup lentils
1 cup canned crushed tomatoes
1 cup water
4 T butter
1 T minced ginger
1 T minced garlic
1/2 to 1 tsp cayenne (depending how spicy you like it!)
Salt
1/3 cup heavy cream
Minced cilantro, to serve

1. Cover the lentils with plenty of water.  Bring to a boil, and simmer 10 minutes.  Drain the water and return the lentils to the pot.
2. Mash some of the lentils on the side of the pot.  Add the tomatoes, water, butter, ginger, garlic, and cayenne. Season generously with salt, and stir everything together.  Return to a boil, and then reduce heat and simmer for about an hour. Make sure to check the pot and stir every ten minutes or so.  You can add more water if things look dry, but you want the sauce to be quite thick.
3. Remove fromt the heat and stir in the cream.  Taste and adjust seasoning.  Serve sprinkled with cilantro.

Coconut-Sesame Green Beans (adapted from She Wears Many Hats, original recipe here)
Serves 4

1/4 cup unsweetened coconut milk (shake the can first or stir before measuring)
1-1/2 tsp lime juice
1/2 tsp garlic powder
1/2 tsp Aleppo pepper
Salt and pepper
1 pound green beans, washed and trimmed
2 tsp toasted sesame seeds

1. Preheat the oven to 425 degrees and line a large baking sheet with foil.  Spray the foil with a little oil.
2. In a large bowl, whisk together the coconut milk, lime juice, garlic powder, and Aleppo pepper.  Season generously with salt and pepper, and stir to combine.  Add the green beans and toss to combine.
3. Spread the green beans onto the baking sheet in an even layer.  Roast 18-22 minutes, until the beans are tender and browned, tossing the beans halfway through roasting.  Toss with the sesame seeds and serve.

Saturday, June 14, 2014

Cold Brew Iced Coffee

Summers in Cambridge are a little...warmer...than summers in Berkeley.  :)  My usual morning coffee is definitely too hot to drink here, so I needed to figure out how to make iced coffee at home so that I didn't have to buy it at the Italian bakery every morning!  Cold brew is the trendy new thing, and for a good reason.  It's easy to make without special equiptment and keeps well in the fridge so you can make a big batch and drink throughout the week.  I like it with milk for an iced "latte," but you can also dilute the concentrate with water for regular iced coffee or add a bit of simple syrup for a sweet drink.  I also found a bunch of recipes for fancier drinks and cocktails, which I've linked to at the bottom of this post -- I am going to be working my way through this list over the summer!


Cold Brew Iced Coffee (adapted from Serious Eats, Bon Appetit, Smitten Kitchen, America's Test Kitchen, and Food52)
Makes about 4 cups of coffee concentrate

1 cup ground coffee
4-1/2 cups cold water
Water or milk, to serve

Stir together the ground coffee and water in a glass container until all the coffee grounds are moistened.  Cover, and let sit overnight (at least 12 hours).

Line a strainer with cheesecloth, and place over a container that is large enough to hold the coffee mixture.  Pour the coffee over.  Then line the strainer with a large coffee filter, and pour the coffee through again -- it may take a while for the coffee to work its way through the filter, but be patient and don't stir!

Pour into Mason jars or a glass pitcher, and store in the fridge until ready to serve.

To serve, mix one part coffee concentrate with equal parts water or milk.  Taste, and feel free to add more water or milk if you like.  Serve over ice.

You can also use the coffee concentrate in some fun drinks/cocktails: Cafee Shakerato, Cold Brew Irish Coffee, Vietnamese Iced Coffee, with a spoonful of milk caramel and a pinch of salt, Fresh Mint Iced Coffee, Vanilla-Cinnamon Iced Coffee, and Thai Iced Coffee.

Thursday, June 12, 2014

Red Pepper-Walnut Relish

I made this relish quite a long time ago and somehow never managed to post it.  I will definitely be making it again soon, becuase it is really tasty.  I am always a fan of roasted red peppers, which you can make yourself if you like, or you can be lazy like me and purchase some in a jar or at the olive bar. If you go the lazy route, the relish takes only a few minutes to put together. The peppers get spiced up with lots of bold flavors -- mint, Aleppo pepper, lemon juice, garlic, and balsmic vinegar -- and toasted walnuts add crunch.  The relish is fantastic on roasted chicken, as in the photo below, but it's also great as a spread on sandwiches and spooned over eggs or roasted veggies.  Once you have this in the fridge, I am willing to bet you'll find a million uses for it!


Red-Pepper Walnut Relish with Roasted Chicken and Kale Caesar Salad from Mollie Katzen's Heart of the Plate

Red Pepper-Walnut Relish (adapted from Bon Appetit)
Makes 1 cup

2 roasted red peppers (you can roast yourself or purchase in a jar), minced
1/4 cup toasted walnuts, coarsely chopped
1 garlic clove, minced
1 T finely chopped mint
1 T olive oil
1 tsp Aleppo pepper
1/2 tsp fresh lemon juice (more to taste)
1/2 tsp balsamic vinegar
Salt and pepper

Comine all the ingredients in a bowl and stir to combine.  Taste and add more Aleppo pepper, lemon juice, salt, or pepper as needed.  Keeps well in the fridge for a few days.

Tuesday, June 10, 2014

White Pizza with Candied Walnuts and Fresh Basil

We love doing pizza night at our house...sometimes I make up a big batch of this no-knead pizza dough, sometimes I spend a little longer and make one of the many pizza dough recipes on this site, and sometimes I cheat and get the pre-made dough at the grocery.  Either way, the fun part is figuring out toppings!  Easy classics like pepperoni or sausage and bell pepper show up a lot, and I also love getting inspired by creative combinations from other blogs, magazines, or cookbooks...some favorites have been buffalo mozzarella-artichoke-lemon, corn-bacon-goat cheese, and butternut squash-gorgonzola.

This white pizza from Food Network Magazine was a great find.  It's super rich and feels like total comfort food.  I added candied walnuts on top for some extra crunch, but you could use any nut here (candied or not).  I love the combination of cheeses -- the ricotta makes the topping extra creamy, the mozzarella adds that perfect ooey-gooey element, and the Parmesan lends great flavor.  Don't skip the fresh basil -- you need it to add a little green and balance out the other rich toppings.  Because there is quite a lot of cheese here, I recommend rolling/stretching your crust a bit on the thicker side...you don't want an extra thin crust or it won't hold up to the toppings.


White Pizza with Candied Walnuts and Fresh Basil (adapted from Food Network Magazine)

1 to 1-1/2 pounds pizza dough (depending on if you want a thicker or thinner pizza)
2/3 cup whole milk ricotta cheese
1/2 cup grated Parmesan cheese
1/4 cup olive oil, plus more for the crust
1 tsp garlic powder
1/2 tsp red pepper flakes
Salt
8 ounces fresh mozzarella, thinly sliced
1/3 cup candied walnuts, minced
1/4 cup minced fresh basil

1. Line a cookie sheet with foil and spray with oil.  Pull the dough out of the fridge and place on the cookie sheet; let rest at least half an hour, or until it comes to room temperature.
2. Preheat the oven to 500 degrees (or as hot as it will go).
3. Mix together the ricotta, Parmesan, olive oil, garlic powder, and red pepper flakes.  Season with a little salt.
4. Stretch the dough out to the size/thickness you prefer.  If it doesn't want to cooperate, let it rest for another few minutes and try again.
5. Bake the dough just until the top looks dry -- you don't want it to brown, but just get cooked enough that the crust won't end up soggy.
6. Brush the edges of the dough with olive oil.  Spread the cheese mixture as evenly as possible over the dough.  Cover with the fresh mozzarella in an even layer.
7. Bake until the cheese is melted and just starting to brown.  Sprinkle with the candied walnuts, and return the pizza to the oven until the crust and cheese are both well browned.
8. Let the pizza rest for 8-10 minutes so the cheese can set up.  Sprinkle with the fresh basil, slice, and serve.

Saturday, June 7, 2014

Pesto Frittata with Potatoes, Asparagus, and Barley

This is one of those clean-out-the-fridge recipes that turned out amazing, so I had to share the recipe!  I think the key parts of the recipe are the pesto and potatoes -- they make for such a delicious combination, and they make for a great hearty fritatta filling.  Then I dressed things up with caramelized onions for a little sweetness, cooked barley for texture, asparagus to add some veggies, and feta cheese for richness and a hit of salt.  You should definitely make substitutions here to use whatever you have in your fridge and need to use up.  This frittata was awesome warm with toast for breakfast, and the leftovers were also great cold for lunch.  


Pesto Frittata with Potatoes, Asparagus, and Barley
Serves 6

8 eggs
1/2 cup light sour cream
1 T flour
1 tsp salt
Freshly ground black pepper
1/2 cup crumbled feta cheese
2 T pesto
1 medium Yukon Gold potato, peeled, boiled until tender, and cut into large chunks
1 bunch asparagus, roasted until tender, cut into bite-sized pieces
1/2 red onion, thinly sliced and caramelized until golden brown
1/2 cup cooked barley
Oil

1. Preheat the oven to 350 degrees.
2. Whisk together the eggs, sour cream, flour, and salt until well mixed -- the mixture can be a little lumpy.  Add several grinds of black pepper, along with the feta cheese and pesto.  Whisk again to combine everything.
3. Add the potato, asparagus, caramelized onions, and barley.  Gently fold together with a rubber spatula.
4. Heat a large non-stick skillet over medium heat.  Add a bit of oil, and swirl the pan to distribute it evenly.  When the oil is hot, pour in the egg mixture into the skillet and use a rubber spatula to make sure all the ingredients are fairly evenly distributed.
5. Cover, reduce heat to low, and cook 8-10 minutes, until the edges of the frittata are set.
6. Take the cover off, and pop the frittata into the pre-heated oven.  Cook until the top is puffed and the eggs are set, 15-25 minutes.
7. Using a rubber spatula, gently transfer the frittata to a cutting board or serving plate.  Let cool 5-10 minutes, and then slice and serve.

Wednesday, June 4, 2014

Mustard-Shallot Salmon with Lemon-y Quinoa

Welcome to Boston!  We arrived here on Saturday, and have been busy getting settled and exploring the area.  Our boxes haven't arrived yet, so we haven't cooked anything too exciting yet, but we did make pizza in our new kitchen (yum!).

This recipe is from a couple of weeks before we moved, and I'm excited to try it out again soon once all our pots and pans get here.  The sauce on the salmon is fantastic, combining mustard, shallots, brown sugar, and white wine.  I wasn't 100% sure of the flavor combinations before I made it, but they worked out really well.  Instead of rice, which is what I would often serve with fish, I made quinoa with lemon and basil.  It was a great way to add color and texture, and also makes the dish a little healthier.  Round things out with simple roasted green beans (toss with olive oil, salt, and pepper and pop in a 400 degree oven until tender).


Mustard-Shallot Salmon with Lemon-y Quinoa (adapted from Cooking Light)
Serves 4

2 cups water
1 cup quinoa
Salt
2 T minced basil
1/2 tsp lemon zest
Juice of 1/2 lemon
Freshly ground pepper
Cooking spray
1 T butter
1 medium shallot, minced
1/4 cup dry white wine
2 T whole-grain mustard
1 T brown sugar
4 salmon fillets (about 6 ounces each)

1. Prepare the quinoa: Bring the water to a boil in a saucepan.  Add the quinoa, and season generously with salt.  Return to a boil, and then reduce to a simmer and cover.  Cook for about 12 minutes, then drain any remaining water.  Return the quinoa to the pot, cover, and let rest while you prepare the rest of the meal.  When ready to serve, stir in the basil, lemon zest, and lemon juice, and season with salt and pepper.
2.  Preheat the oven to 350 degrees.  Line a sheet pan with foil and spray with oil.
3.  Prepare the mustard-shallot glaze: Melt the butter in a large, non-stick skillet over medium heat.  Add the shallots, and cook for 3-4 minutes, until softened but not browned.  Add the wine, and continue to cook until it has mostly evaporated.  Stir in the mustard and brown sugar, and stir until the sugar has melted.  Remove from the heat.
4. Prepare the salmon: Place the salmon skin-side-down on the prepared baking sheet.  Season with salt and pepper.  Spread half of the mustard-shallot mixture on the salmon fillets.  Bake 12 minutes, until cooked through.  Spread the remaining mustard-shallot mixture over the salmon.  Serve with the lemon-y quinoa.


Apparently Dunkin' Donuts is very big in Boston! :)