Saturday, November 1, 2008

October DB: Pizza!

I'm a couple of days late posting this month because of post-exam malaise...it's been tough to get back into blogging! But, better late than never, right? And I am so glad I made this pizza, even though it's a bit more complicated than my usual pizza recipe. The dough is super light and has a delicious flavor...much more complex flavor than what I usually make. The overnight fermentation does require some advance planning, but it's more than worth it in the final product. Amazing!


I made four pizzas:
1. Tomato sauce, mozzarella, olives, sun dried tomatoes, caramelized onions
2. Olive oil, fresh mozzarella, sopressata
3. Mediterranean pizza: olive oil/tomato sauce, mozzarella, fresh mozzarella, artichoke hearts, olives, sun dried tomatoes
4. Tomato sauce, prosciutto, mozzarella, caramelized onions

Yum! This recipe comes courtesy of Rosa of Rosa's Yummy Yums...thanks to her for an amazing recipe that I'll now be using over and over again! The pizza recipe itself comes from The Bread Baker's Apprentice: Mastering The Art of Extraordinary Bread by Peter Reinhart. I found that the recipe was pretty forgiving--I was making the dough late at night, so I just mixed everything together without chilling anything first. I also used regular dry yeast instead of instant since that was what I had on hand (I just dissolved it in the cold water first). Finally, I put the dough into the fridge in a bowl rather than dividing it up first (due to fridge space constraints). I just divided it up the next evening, and this seemed to work just fine. To bake the pizza, I used this cool pizza pan my housemate has that has little holes in the bottom to help the bottom crust be extra crisp. Be sure to check out all the other amazing pizzas everyone else came up with on the DB blogroll (link to the right).

Basic Pizza Dough (from The Bread Baker’s Apprentice by Peter Reinhart)

Makes 6 pizza crusts (about 9-12 inches/23-30 cm in diameter).

Ingredients:
4 1/2 cups Unbleached high-gluten (%14) bread flour or all purpose flour, chilled
1 3/4 tsp Salt
1 tsp Instant yeast
1/4 cup olive oil
1 3/4 cups water, ice cold
1 T sugar
Semolina/durum flour or cornmeal for dusting

DAY ONE

Method:
1. Mix together the flour, salt and instant yeast in a big bowl (or in the bowl of your stand mixer).

2. Add the oil, sugar and cold water and mix well (with the help of a large wooden spoon or with the paddle attachment, on low speed) in order to form a sticky ball of dough. On a clean surface, knead for about 5-7 minutes, until the dough is smooth and the ingredients are homogeneously distributed. If it is too wet, add a little flour (not too much, though) and if it is too dry add 1 or 2 teaspoons extra water.

NOTE: If you are using an electric mixer, switch to the dough hook and mix on medium speed for the same amount of time.The dough should clear the sides of the bowl but stick to the bottom of the bowl. If the dough is too wet, sprinkle in a little more flour, so that it clears the sides. If, on the contrary, it clears the bottom of the bowl, dribble in a teaspoon or two of cold water.
The finished dough should be springy, elastic, and sticky, not just tacky, and register 50°-55° F/10°-13° C.


3. Flour a work surface or counter. Line a jelly pan with baking paper/parchment. Lightly oil the paper.

4. With the help of a metal or plastic dough scraper, cut the dough into 6 equal pieces (or larger if you want to make larger pizzas).

NOTE: To avoid the dough from sticking to the scraper, dip the scraper into water between cuts.

5. Sprinkle some flour over the dough. Make sure your hands are dry and then flour them. Gently round each piece into a ball.

NOTE: If the dough sticks to your hands, then dip your hands into the flour again.

6. Transfer the dough balls to the lined jelly pan and mist them generously with spray oil. Slip the pan into plastic bag or enclose in plastic food wrap.

7. Put the pan into the refrigerator and let the dough rest overnight or for up to thee days.

NOTE: You can store the dough balls in a zippered freezer bag if you want to save some of the dough for any future baking. In that case, pour some oil(a few tablespooons only) in a medium bowl and dip each dough ball into the oil, so that it is completely covered in oil. Then put each ball into a separate bag. Store the bags in the freezer for no longer than 3 months. The day before you plan to make pizza, remember to transfer the dough balls from the freezer to the refrigerator.

DAY TWO

8. On the day you plan to eat pizza, exactly 2 hours before you make it, remove the desired number of dough balls from the refrigerator. Dust the counter with flour and spray lightly with oil. Place the dough balls on a floured surface and sprinkle them with flour. Dust your hands with flour and delicately press the dough into disks about 1/2 inch/1.3 cm thick and 5 inches/12.7 cm in diameter. Sprinkle with flour and mist with oil. Loosely cover the dough rounds with plastic wrap and then allow to rest for 2 hours.

9. At least 45 minutes before making the pizza, place a baking stone on the lower third of the oven. Preheat the oven as hot as possible (500° F/260° C).

NOTE: If you do not have a baking stone, then use the back of a jelly pan. Do not preheat the pan.

10. Generously sprinkle the back of a jelly pan with semolina/durum flour or cornmeal. Flour your hands (palms, backs and knuckles). Take 1 piece of dough by lifting it with a pastry scraper. Lay the dough across your fists in a very delicate way and carefully stretch it by bouncing it in a circular motion on your hands, and by giving it a little stretch with each bounce. Once the dough has expanded outward, move to a full toss.

NOTE: Make only one pizza at a time.
During the tossing process, if the dough tends to stick to your hands, lay it down on the floured counter and reflour your hands, then continue the tossing and shaping.
In case you would be having trouble tossing the dough or if the dough never wants to expand and always springs back, let it rest for approximately 5-20 minutes in order for the gluten to relax fully,then try again.
You can also resort to using a rolling pin, although it isn’t as effective as the toss method.


11. When the dough has the shape you want (about 9-12 inches/23-30 cm in diameter - for a 6 ounces/180g piece of dough), place it on the back of the jelly pan, making sure there is enough semolina/durum flour or cornmeal to allow it to slide and not stick to the pan.

12. Lightly top it with sweet or savory toppings of your choice.

NOTE: Remember that the best pizzas are topped not too generously. No more than 3 or 4 toppings (including sauce and cheese) are sufficient.

13. Slide the garnished pizza onto the stone in the oven or bake directly on the jelly pan. Close the door and bake for abour 5-8 minutes.

NOTE: After 2 minutes baking, take a peek. For an even baking, rotate 180°.

If the top gets done before the bottom, you will need to move the stone or jelly pane to a lower shelf before the next round. On the contrary, if the bottom crisps before the cheese caramelizes, then you will need to raise the stone or jelly.


14. Take the pizza out of the oven and transfer it to a cutting board or your plate. In order to allow the cheese to set a little, wait 3-5 minutes before slicing or serving.

Tuesday, October 21, 2008

Moistest Ever Chocolate-Peanut Butter Triple Layer Cake

This cake was totally amazing. It's like a really rich Reese's peanut butter cup in cake form, only about a thousand times better. I could not stop eating it! Make sure to chill it well before frosting and you'll get a neater frosting job than I did. :) The cake is super moist, and the frosting is so rich and delicious...you must try the recipe!


Chocolate-Peanut Butter Triple Layer Cake (from Sky High: Triple Layer Cakes)

2 cups all-purpose flour
2 1/2 cups sugar
3/4 cup unsweetened cocoa powder, preferably Dutch process
2 teaspoons baking soda
1 teaspoon salt
1 cup neutral vegetable oil
1 cup sour cream
1 1/2 cups water
2 tablespoons distilled white vinegar
1 teaspoon vanilla extract
2 eggs

1. Preheat the oven to 350 degrees. Line three 8-inch round cake pans with buttered parchment circles in the bottoms of the pans. Butter and flour the pans. (Make sure to get them really buttered and floured--these cakes are really sticky!)
2. Sift together the dry ingredients (flour sugar, cocoa powder, baking soda, and salt). Whisk to combine; then add the oil and sour cream and whisk together. Gradually whisk in the water, followed by the vinegar and vanilla. Whisk in the eggs and beat well to blend, scraping down the sides of the bowls as needed.
3. Divide among the three pans and bake for about 30-35 minutes. Cool, then very carefully remove from the pans. Wrap in plastic wrap and freeze about 30 minutes before frosting.

Frosting
10 ounces cream cheese, at room temperature
1 stick unsalted butter, at room temperature
5 cups confectioners’ sugar, sifted
2/3 cup smooth peanut butter (not a "natural" variety)

1. Beat together the cream cheese and butter until fluffy. Add the confectioners' sugar slowly...you might not use all of it. Add the peanut butter and beat thoroughly for 3-4 minutes until light and fluffy.
2. Remove the cakes from the freezer and place one layer on the serving tray. Spread 2/3 cup frosting on the bottom layer; top with a second layer, another 2/3 cup of frosting, and the top layer of cake. Spread a thin layer of frosting on the entire cake. Chill for about 20-30 minutes. Frost the cake evenly with

Monday, October 20, 2008

Sweet Potato-Black Bean Chili

Eek, it's been forever since I've posted here! But, my big exam is over, and so things may go somewhat back to normal. :)

I've been making this chili for a long time, but somehow never actually managed to post it here! It's extremely easy and very versatile. Since it has beans, there's plenty of protein and the chili is filling without any meat. But it's also tasty with ground turkey, sweet Italian sausage, a mix of sweet and hot Italian sausage, or any other meat.

Part of the reason this dish is so easy is that it relies on jarred salsa for a lot of the flavor--so don't skimp on a cheap brand. I like to use one that involves tomatoes, black beans, and corn, but whichever you go with, you definitely want to go for the more normal flavors rather than a peach or pineapple salsa. You can vary the heat level according to how spicy you'd like the chili.


Sweet Potato-Black Bean Chili (from Good Housekeeping)

1 T olive oil
1 medium onion, chopped
2 cloves garlic, chopped
2 medium sweet potatoes or yams (about 12 oz. each), peeled and cut into 1/2-inch dice
1 T chili powder
1 16 oz. jar salsa
1 cup water
3/4 lb. ground turkey, sweet Italian sausage, etc. (optional)
2 15-19 oz. cans black beans

1. In a large pot, heat the olive oil. Add the onions, and saute until they begin to soften. Add the garlic, and saute one minute.
2. Stir in the sweet potatoes, chili powder, salsa, and water. Bring to a boil, then reduce heat and simmer about 12-15 minutes, until the potatoes are tender.
3. Meanwhile, crumble the meat and saute over medium heat until well-browned. Set aside on a paper towel to drain.
4. Add the browned meat and black beans (with their liquid) to the soup. Stir well and cook three minutes or until everything is heated through. Enjoy with cheddar cheese and/or sour cream.

Thursday, October 9, 2008

Hershey's Chocolate Brownies with Frosting

My posting has been rather erratic of late as I'm preparing for a comprehensive field exam in my PhD program, which is taking place on Monday...wish me luck! This test is in the field of public law (I took the exam in American politics last spring), so any good wishes with regard to the Supreme Court or judicial behavior would be much appreciated... :)

These gooey brownies are super delicious. They're perfect for those times when you want a brownie that tastes like a brownie mix, except exceptionally good! The recipe comes from Hershey's and so both the brownies and the frosting use cocoa powder, which is really convenient and easy. They taste fabulous and just like a good brownie should taste! The frosting makes them extra decadent, so don't skip it (or the little bit of corn syrup).


Hershey's Chocolate Brownies with Frosting (recipe from Hershey's)

Brownies:
2 sticks butter
2 cups sugar
2 teaspoons vanilla extract
4 eggs
3/4 cup cocoa
1 cup all-purpose flour
1/2 teaspoon baking powder
1/4 teaspoon salt

Frosting:
6 tablespoons butter, softened
6 tablespoons cocoa
2 tablespoon light corn syrup
1 teaspoon vanilla extract
2 cups powdered sugar
2 to 4 tablespoons milk

1. Preheat the oven to 350 degrees and grease a 13x9 inch brownie pan.
2. Make the brownies: Melt the butter, and then stir in the sugar and vanilla. Add the eggs one at a time, beating well after each egg. Stir in the cocoa. Sift in the flour, baking powder, and salt, and stir to combine. Pour into the pan and bake for 30 minutes. Cool completely.
3. Make the frosting: Beat the butter, cocoa, corn syrup, and vanilla until light and fluffy. Add the powdered sugar and the smaller amount of milk, and beat well. Add milk until a spreading consistency is attained. Frost the cooled brownies with an offset spatula.

Tuesday, September 30, 2008

Thanksgiving in September: Creamy Sugar and Spice Pumpkin Pie

This pie was my final dish for the mini-Thanksgiving we had a couple of weeks ago. It's amazing--extra creamy from all that heavy cream, perfectly pumpkin-flavored, and just the right amount of spice to taste just like fall without being overwhelming. The crust melted a little on me in the oven, a problem I seem to have with pie crusts for some reason, but it was still delicious once I pushed it up the sides with a spoon and poured in the filling.


Creamy Sugar and Spice Pumpkin Pie (adapted from Fine Cooking)

For the crust:
1/2 tsp salt
1/3 cup very cold water
1 1/2 cups flour
10 T cold unsalted butter, cut into 1-inch pieces

For the filling:
15-oz. can pure pumpkin
2 large eggs
1 large egg yolk
1 cup heavy cream
1 T light rum or brandy
3/4 cup lightly packed brown sugar
1 tsp ground ginger
1 tsp ground cinnamon
1/2 tsp table salt
1/8 tsp grated nutmeg
1/8 tsp freshly ground black pepper
Generous pinch ground cloves

1. Make the crust. In a small bowl, mix together the salt and water until dissolved. Place in the freezer while you get everything else ready.
2. Put the flour in a food processor and scatter the butter on top. Pulse until the mixture forms large crumbs and some of the butter is in pieces the size of peas, about 8 pulses. Add the salt water and pulse until the dough begins to come together in large clumps with some pieces of butter still visible. Shape into a 1-inch-thick disk, wrap in plastic, and place in the refrigerator for at least one hour.
3. Place the dough circle between two sheets of wax paper and roll out to a 1/8 inch thick circle. Transfer to a 9-inch pie plate that has been sprayed with oil. Crimp the edges.
4. Place the crust in the freezer for at least 30 minutes. Then preheat the oven to 400 degrees, line the pie shell with parchment, and fill it with pie weights or dried beans. Bake until the sides have set and look dry, 16-20 minutes. Remove weights and bake 5 minutes more. If the dough starts to bubble, push it back down with the back of a spoon. Let the crust cool completely.
5. Make the filling: Preheat the oven to 325 degrees. Meanwhile, whisk together the pumpkin, eggs, yolk, cream, and rum in a large bowl. In a separate bowl, combine the brown sugar, ginger, cinnamon, salt, nutmeg, pepper, and cloves. Stir together with a fork to get rid of any lump in the brown sugar. Then gently whisk the sugar mixture into the pumpkin.
6. Pour filling into cooled crust and bake until pie is set around the outside but still slightly wet and jiggly in the middle, about 1 hour. Let cool completely, and then chill for at least 2 hours before serving. The pie will keep for 2 days in the fridge.
7. Serve with lightly sweetened whipped cream or vanilla ice cream.

Saturday, September 27, 2008

September Daring Bakers: Lavash Crackers with White Bean-Artichoke-Rosemary Dip

This month's Daring Bakers challenge comes from Natalie of Gluten A Go Go and Shel of Musings From the Fishbowl. The challenge was to go vegan and gluten-free for a month! For the lavash crackers, we had the option to use regular flour or gluten-free, and for the dip we had to make something both vegan and gluten-free.

The lavash crackers were super delicious! They were quite easy to whip up, with the only problem getting them to roll out thin enough! I think if I'd had a pasta maker it might have gone better, but as it was they were very difficult to get thin. Nonetheless, the crackers tasted delicious even if they were a bit thicker than normal. I sprinked half with Tuscan seasoning salt and the other half with Provencal seasoning salt, both of which resulted in truly tasty crackers. They were a little crisper the second day, which was nice.

For my dip, I went for a white bean-artichoke-rosemary dip that was quick to put together in the food processor and super delicious (also a little better the second day after the flavors had time to meld). The recipe makes too much for one batch of crackers, so I also enjoyed it as a spread on a ham and swiss sandwich.

Lavash Crackers (from The Bread Baker's Apprentice by Peter Reinhart)

The key to a crisp lavash,…is to roll out the dough paper-thin. The sheet can be cut into crackers in advance or snapped into shards after baking. The shards make a nice presentation when arranged in baskets.

Makes 1 sheet pan of crackers

1 1/2 cups (6.75 oz) unbleached bread flour
1/2 tsp (.13 oz) salt
1/2 tsp (.055 oz) instant yeast
1 Tb (.75 oz) agave syrup or sugar (or honey if you aren't vegan)
1 Tb (.5 oz) vegetable oil
1/3 to 1/2 cup + 2 Tb (3 to 4 oz) water, at room temperature
Poppy seeds, sesame seeds, paprika, cumin seeds, caraway seeds, or kosher salt for toppings

1. In a mixing bowl, stir together the flour, salt yeast, agave, oil, and just enough water to bring everything together into a ball. You may not need the full 1/2 cup + 2 Tb of water, but be prepared to use it all if needed.

2. Sprinkle some flour on the counter and transfer the dough to the counter. Knead for about 10 minutes, or until the ingredients are evenly distributed. The dough should pass the windowpane test (see http://www.wikihow.com/Determine-if-Bre … ong-Enough for a description of this) and register 77 degrees to 81 degrees Fahrenheit. The dough should be firmer than French bread dough, but not quite as firm as bagel dough (what I call medium-firm dough), satiny to the touch, not tacky, and supple enough to stretch when pulled. Lightly oil a bowl and transfer the dough to the bowl, rolling it around to coat it with oil. Cover the bowl with plastic wrap.

3. Ferment at room temperature for 90 minutes, or until the dough doubles in size. (You can also retard the dough overnight in the refrigerator immediately after kneading or mixing).

4. Mist the counter lightly with spray oil and transfer the dough to the counter. Press the dough into a square with your hand and dust the top of the dough lightly with flour. Roll it out with a rolling pin into a paper thin sheet about 15 inches by 12 inches. You may have to stop from time to time so that the gluten can relax. At these times, lift the dough from the counter and wave it a little, and then lay it back down. Cover it with a towel or plastic wrap while it relaxes. When it is the desired thinness, let the dough relax for 5 minutes. Line a sheet pan with baking parchment. Carefully lift the sheet of dough and lay it on the parchment. If it overlaps the edge of the pan, snip off the excess with scissors.

5. Preheat the oven to 350 degrees Fahrenheit with the oven rack on the middle shelf. Mist the top of the dough with water and sprinkle a covering of seeds or spices on the dough (such as alternating rows of poppy seeds, sesame seeds, paprika, cumin seeds, caraway seeds, kosher or pretzel salt, etc.) Be careful with spices and salt - a little goes a long way. If you want to pre-cut the cracker, use a pizza cutter (rolling blade) and cut diamonds or rectangles in the dough. You do not need to separate the pieces, as they will snap apart after baking. If you want to make shards, bake the sheet of dough without cutting it first.

5. Bake for 15 to 20 minutes, or until the crackers begin to brown evenly across the top (the time will depend on how thinly and evenly you rolled the dough).

6. When the crackers are baked, remove the pan from the oven and let them cool in the pan for about 10 minutes. You can then snap them apart or snap off shards and serve.

White Bean-Artichoke-Rosemary Dip (from SELF magazine)

1 clove garlic, peeled
1 tsp dried rosemary
3 tbsp fresh lemon juice
2 cans (15.5 oz each) white beans (drained and rinsed)
1 can (14 oz) artichoke hearts (packed in water, drained)
Salt and pepper to taste

Put the garlic and rosemary in the food processor and process until finely chopped. Add the lemon juice and pulse briefly. Add the white beans and artichoke hearts, and process until smooth. Add salt and pepper to taste.

Thursday, September 25, 2008

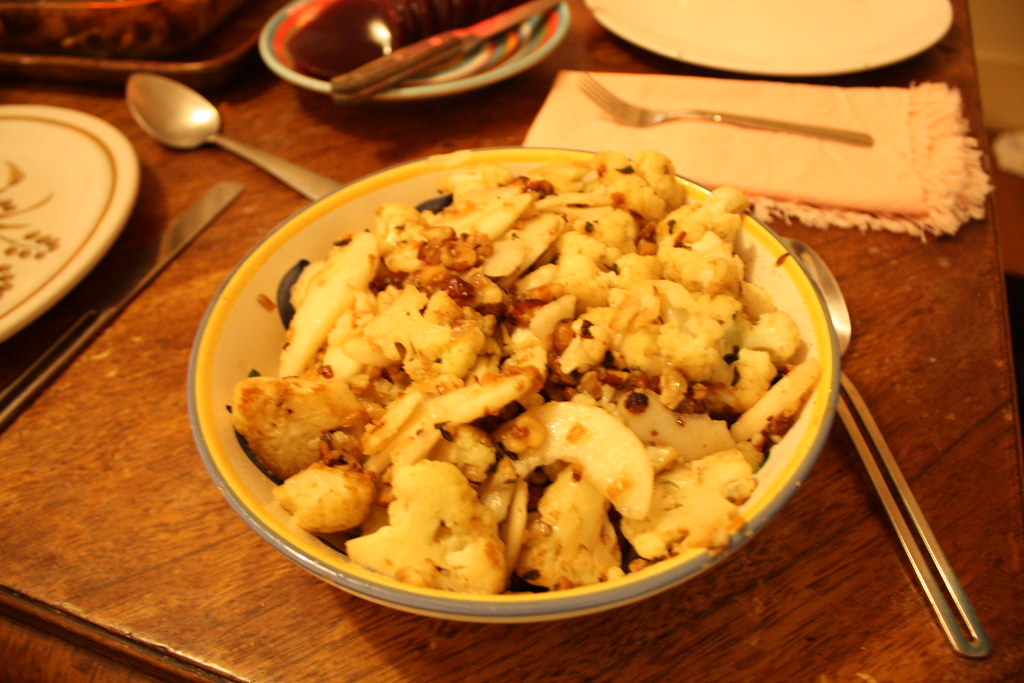
Thanksgiving in September: Cauliflower with Brown Butter, Pears, Sage, and Hazelnuts

This was dish number two of the Thanksgiving in September extravaganza. It's a really unique dish, and the flavors go together very well. The cauliflower is nutty, the pears lend just the right sweet touch, and the nuts add great crunch. And then you can't beat the flavor of browned butter! This is an elegant side dish that's easy to pull together...it's also fun to surprise your guests with the unusual combination of flavors!


Cauliflower with Brown Butter, Pears, Sage, and Hazelnuts (from Fine Cooking)

6 T unsalted butter
1 medium head cauliflower, cut into florets
1/2 cup chopped hazelnuts (I bought a 1/2 cup bag in the baking section, but you could toast and chop them yourself)
8 fresh sage leaves, thinly sliced crosswise
Kosher salt and freshly ground pepper
2 ripe pears, peeled, cored, and thinly sliced

1. In a 12-inch skillet over medium heat, melt the butter. Cook until browned and bubbling, swirling the pan occasionally.
2. Add the cauliflower, hazelnuts, and sage. Cook 2 minutes, stirring occasionally. Season with 1 tsp salt and 1/2 tsp pepper. Continue to cook until the cauliflower is browned and tender.
3. Remove pan from heat and toss in the pears gently to combine. Season to taste with more salt if needed.