Sunday, December 29, 2013

Roasted Cauliflower-Carrot Soup

Hopefully everyone has had a wonderful holiday.  If you need to detox a bit after all the delicious holiday food you've been eating, this soup will fit the bill -- I made it a few weeks ago, but I think it's perfect for the lull between Christmas and New Year's!

This is a recipe I came up with by taking a look at what was left in the fridge and pantry!  Both the carrots and cauliflower were left from a curry recipe earlier in the week, and I wanted to finish them off -- they turned out to be a great combination!  The cauliflower added body to the soup, while the carrots added a great orange color.  If you plan ahead and roast the cauliflower earlier in the week (I threw it in the oven while my curry was cooking), this soup is super simple to pull together - even if you add in the roasting step, it will still be pretty easy.  Aleppo pepper and smoked paprika add that perfect element of smoke and heat that keeps a pureed soup from being too boring.  I topped my soup with Parmesan, but nuts, seeds, or croutons would also be really tasty.  I popped these fluffy dinner rolls in the oven before starting the soup and the timing was perfect -- together, they made a tasty, light dinner.

Note: if you skip the cheese and sub veggie or mushroom broth for the chicken broth, this soup can easily be made vegan!


Roasted Cauliflower-Carrot Soup
Serves 4

1 medium head cauliflower, cut into florets
Oil
Salt and pepper
1/2 medium yellow onion, peeled and chopped
3 large carrots, peeled and chopped
1/2 tsp Aleppo pepper flakes
1/2 tsp smoked paprika
4 cups chicken broth
Grated Parmesan cheese, to serve

1. Preheat the oven to 400 degrees and line a baking sheet with foil.
2. Toss the cauliflower with oil, and season with salt and pepper.  Spread out in an even layer on the baking sheet.  Roast until browned and tender, stirring once, about 15-20 minutes total (check often to make sure the cauliflower does not burn).
3. Heat more oil in a soup pot over medium heat.  Add the onions and cook for about 5 minutes, until starting to soften.  Add the carrots, and continue to cook, stirring occasionally, for another 5 minutes or so.  Add the Aleppo and smoked paprika and stir for one more minute.
4. Add the chicken broth and the roasted cauliflower.  Bring to a boil, and simmer for 15 minutes or so until everything is nicely tender.
5. Puree the soup until super smooth with an immersion blender.
6. Serve topped with grated Parmesan cheese.

Monday, December 23, 2013

Fast and Fluffy Dinner Rolls

Sometimes you find those recipes that are just pure genius - totally different than the way you've made a dish before, but so fantastic that you immediately fall in love.  This roll recipe is definitely one of those.  It's made using hot milk and water, and then the rolls are shaped and popped into a warm oven.  After a quick rise, you turn the oven up and leave the rolls in there while the oven comes up to temperature.  When you pull out the rolls, magic has occurred - they're perfectly browned on top and have gotten huge and fluffy!  I was impressed at how light and fluffy the rolls were despite a short rising time, and I was really impressed at how quickly the whole recipe came together -- if you want rolls for dinner but you haven't planned ahead, this recipe is definitely the way to go!  Of course they're best right out of the oven, but the leftovers were also amazing toasted and spread with jam.


Fast and Fluffy Dinner Rolls (adapted from Jamie Cooks It Up!, original recipe here)
Makes 12 rolls

3/4 cup milk (I used 1%)
6 T butter, divided
3/4 cup very warm water
1/4 cup sugar
1-1/2 tsp kosher salt
4 to 4-1/2 cups all purpose flour
1 heaping T instant yeast

1. Preheat the oven to "warm" or 170 degrees.
2. Combine the milk and 4 T of the butter in a small saucepan.  Heat until the butter is melted and the mixture is just starting to form small bubbles.
3. Add the hot milk mixture to the bowl of a stand mixer with the water, sugar, and salt.  It's fine to use water that is warmer than you would usually use for yeast dough, as you'll be adding flour first to cool things off a bit.  Stir everything together.
4. Add 2 cups of flour and mix for about a minute.  Add another 2 cups of flour along with the yeast.  Mix with a dough hook, adding more flour as needed to reach a soft consistency that just pulls away from the sides of the bowl (it will stick to the bottom).  Mix on low speed for about 5 minutes.
5. Cover the mixture with plastic wrap and let sit 5 minutes.
6. While the dough is resting, spray a work surface with oil.  Then, melt the remaining 2 T butter.  Use about half the butter to generously grease a 9x13 baking pan.
7. With wet hands, turn the dough out onto the oiled work surface.  Divide into 12 pieces - a pair of kitchen shears will do this easily.  If the dough starts to stick to your hands, get them wet again and you shouldn't have too much of a problem.  Don't worry about the dough being very soft and sticky - this is the way it's meant to be!
8. Roll each piece of dough into a small ball, and place in the baking pan.
9. Put the pan into the warm oven, and let rise for 20 minutes -- do not cover with plastic wrap or anything else.
10. After 20 minutes, turn the oven up to 350.  Let the rolls bake for about 15 minutes, checking them often -- they will need more or less time depending on how quickly your oven heats up.
11. When the rolls are a nice golden brown on top, pull them out and immediately brush with the remaining melted butter.  Let cool for about 5 minutes or so, and then eat while warm!

Friday, December 20, 2013

Cranberry Port Jam

Have you left your holiday gift-making to the last minute? Usually I make lots of jams in the summer to give as gifts, but this year I had too much going on and failed to get much canned!  If you're in my boat (or just need a few extras), this cranberry port jam is the answer to your problems.  It's easy to make (at least as jam-making goes) and uses a winter fruit.  Plus, it's extra delicious! I was a little worried the jam would just taste like cranberry sauce, but the port and sugar really take it into jam territory.  I think it would be fantastic on biscuits or dinner rolls, and my friend suggested using it on a turkey sandwich (yum!).  The best part is, this makes six jars, so you'll have some to give and some to keep.

Note: If you're new to canning/preserving, you should do some reading beyond this recipe or try it out with an experienced friend.  I took an in-person class from these guys and it really gave me the knowledge and confidence to do lots of canning without fear of poisoning anyone!  If you're not sure about how to can properly, this recipe will work just fine as a freezer jam.


Cranberry Port Jam (adapted from Serious Eats, original recipe here)
Makes 6 half-pint jars

12 ounce bag of fresh cranberries
1-1/2 cups ruby port
1/2 cup water
1 package liquid pectin (such as Certo)
1/2 tsp unsalted butter
1/2 cup dried cranberries, chopped
4-1/2 cups granulated sugar

1. Pulse the cranberries in the food processor until coarsely chopped.  Place in a very large pot -- you will need more space than you think, because there's a lot of sugar and the jam will bubble vigorously!  Add the port and water.  Bring to a boil, and then simmer until the cranberries have softened, stirring occasionally.  This should take about 10 minutes.
2. Add the pectin and butter, and return the mixture to a boil.  Once the mixture boils, add the dried cranberries and sugar all at once.  Return to a hard boil (i.e. one that cannot be stirred down), and boil for one minute.  Make sure to stir constantly during this part, as the jam can easily burn!  Remove the jam from the heat.
3. Ladle the jam into sterilized jars, leaving 1/4-inch headspace.  If you're using the standard half-pint size, you will need six.  At this point, you can let the jam cool and then refrigerate or freeze.  Or, you can preserve the jam in a boiling water bath for 10 minutes.  Let the jars sit out at room temperature overnight, and then check to make sure the lids have popped before storing at room temperature and/or gifting.

Friday, December 13, 2013

Spicy! Chicken-Green Chile Enchiladas with Homemade Enchilada Sauce + Giveaway Winners

These enchiladas are SPICY but delicious! I've never made my own enchilada sauce before, and it was way easier than I thought it would be.  It's not as authentic as one made with dried chilis, but it's a lot more delicious than the type out of a jar.  And, it made the perfect amount for a pan of enchiladas, at least to my taste (I like mine pretty saucy!).

The filling is a tasty combination of chicken, green chiles, tomatoes, and Monterey Jack cheese.  I usually put lots of cheese both in and on my enchiladas, but this cheese-lite version was really good!  Next time I'd probably do a less spicy filling to pair with the spicy sauce, although you can make both together if you're a fan of spicy food.  One tip on the chicken -- you can cook it any way you like (or get a rotisserie chicken), but everything will come together more quickly if you get it ready the night before - you can just roast it in the oven while you eat dinner and then it's all ready to tuck into the enchiladas the next day!

I'm also excited to announce the winners of my Bertolli Extra Light Tasting Olive Oil giveaway!  Everyone had really creative and delicious-sounding ideas for using this oil - just reading through the comments made me hungry!  The winners are Heather with her Guinness Bundt Cake (um, who could resist a recipe with that title?!) and Meghan with her homemade tater tots (I am a sucker for homemade tater tots...so amazing!).  Congrats to the winners - check your email for a message from me so that I can get your address to ship the olive oil.  (If I don't hear anything back by Monday, I'll have to choose another winner.)


Spicy! Chicken-Green Chile Enchiladas with Homemade Enchilada Sauce (adapted from Budget Bytes, original recipe here)
Serves 4

For the sauce:
2 T vegetable oil
2 T flour
2 T chili powder
2 cups chicken broth or water
3 ounces tomato paste
1/2 tsp cumin
1/2 garlic powder
1/4 tsp Aleppo pepper or cayenne pepper (to taste)
1/2 tsp salt

For the enchiladas:
2 chicken breasts, cooked and diced (about 2 cups)
10 ounce can diced tomatoes with chile (such as Rotel brand)
4 ounce can diced green chiles
1 cup freshly shredded Monterey Jack cheese (don't use the pre-shredded stuff!)
10 corn tortillas, heated until warm (a microwave is great for this)

1. Make the sauce. Combine the oil, flour, and chili powder in a medium pot.  Turn the heat to medium, and whisk the ingredients to combine.  When the mixture begins to bubble, let it bubble, whisking constantly, for one minute -- the mixture will be very thick.
2.  Whisk in the chicken broth a bit at a time, and then add the tomato paste, cumin, garlic powder, Aleppo or cayenne pepper, and salt.  Whisk until smooth, and bring to a simmer.  Once the mixture thickens slightly, taste and adjust for seasoning.  Set aside.
3. Preheat the oven to 350 degrees.  Spray a 9x13 baking dish with oil.
4. In a large bowl, combine the chicken, diced tomatoes, green chiles, and cheese.  Stir until well combined.
5. Fill each tortilla with about 1/3 cup of the chicken mixture, carefully roll up, and place in the baking dish.
6. Once the dish is full, pour the sauce over the top in an even layer.  Depending on how much sauce you like, you may not use it all (I like lots of sauce, so I did!).
7. Cover the dish with foil and bake 30 minutes.
8. Remove the dish from the oven and let sit about 10 minutes before serving.

Wednesday, December 11, 2013

Snickerdoodles

This past weekend, Tim and I were really feeling the Christmas spirit! On Saturday, we went into San Francisco to check out the holiday displays at the Hyatt, Union Square, and Macy's (adorable kittens!) -- gorgeous sunny weather but cold enough that it really felt like winter.  And, on Sunday we had a blast at church making Advent crafts in the morning and then baking Christmas cookies in the afternoon.  Tim baked one of his family's favorites, snowballs. I don't think I've ever had them before, and they were amazing - pecan studded shortbread cookies, wrapped around Hershey's kisses and dusted with powdered sugar!  I will definitely be taking this recipe back to bake with my family when I go to visit them.

I opted for snickerdoodles, because they're one of my favorites and I hadn't had any in a while.  Martha Stewart's recipe was super simple but really delicious - soft, slightly chewy cookies with lots of cinnamon-sugar flavor coating the outsides.  The main change I made to the recipe was to make the cookies smaller, since then you can eat more than one!  These still make medium-sized cookies - you could use rounded teaspoons if you prefer even smaller cookies.  Definitely try to use a high-quality cinnamon if you can -- I used Vietnamese cinnamon from Penzey's and I think it really added something special.  What holiday cookies are you baking this year?  Let me know in the comments!


Snickerdoodles (adapted from Martha Stewart's Cookies: The Very Best Treats to Bake and to Share)
Makes about 2-1/2 dozen

2-3/4 cups all-purpose flour
2 tsp baking powder
1/2 tsp coarse salt
1 cup (2 sticks) unsalted butter, room temperature
1-1/2 cups plus 3 T sugar
2 large eggs
1 T ground cinnamon (preferably Vietnamese cinnamon)

1. Sift together the flour, baking powder, and salt.  Set aside.
2. Beat together the butter and 1-1/2 cups of the sugar on medium-high speed until pale and fluffy, about 3 minutes.  Beat in the eggs one at a time.  Reduce speed to low and gradually mix in the flour mixture.
3. Scrape the dough into a clean bowl, and chill about 30 minutes (longer is fine).
4. Preheat the oven to 350 degrees and line baking sheets with parchment.
5. In a small dish, stir together the cinnamon and remaining 3 T sugar.  Scoop the dough by the heaping tablespoon, roll into balls, and then roll into the cinnamon-sugar, making sure each ball is generously coated.  Arrange on the baking sheets with plenty of space in between (I did 9 per insulated baking sheet).  Press down on each ball gently with the bottom of a measuring cup or glass, to a little thicker than 1/4-inch thick.
6. Bake 8-12 minutes, until the tops are dry -- keep a close eye after 8 minutes or so as the cookies will go from wet on top to burned on the bottom pretty quickly.  Let cool on wire racks.


I'm sending these cookies to the Secret Recipe Club Holiday Party Link-Up! 

Sunday, December 8, 2013

Secret Recipe Club: Butternut Squash Soup with Pepitas

First off: don't forget to enter my giveaway for Bertolli Extra Light Tasting Olive Oil - it's open until Wednesday night!  Now, on to the main event:

My partner for this month's Secret Recipe Club was Katrina, the writer of Baking and Boys.  When I first looked at her blog, I was sure I was going to make one of her fabulous cookie recipes -- they all look really delicious!  I was super tempted by Katrina's Lofthouse sugar cookies, surprise mint cookies, and chippy peanut butter cookies.  Yum!  However, after all the amazing food of Thanksgiving, I needed to detox a little bit and instead decided to make an amazing butternut squash soup.  I was so glad I changed course, because this is one of the creamiest squash soups I have ever eaten! The texture was so velvety - I couldn't believe there was no cream, dairy, or cheese.  And, although I used chicken stock, it would be very easy to make this recipe vegan with vegetable stock.

I made a few substitutions -- fennel for celery (I admit, I'm a celery-hater, though I know some of my readers are fennel-haters, so you can always sub the celery back in!), onion for shallot, and a sprig of rosemary simply because we had some leftover that I didn't want to go to waste.  Upon typing up the recipe this morning, I also realized I completely left out the maple syrup!  The soup was really delicious without it, but you can add a couple of tablespoons if you prefer a sweeter soup.

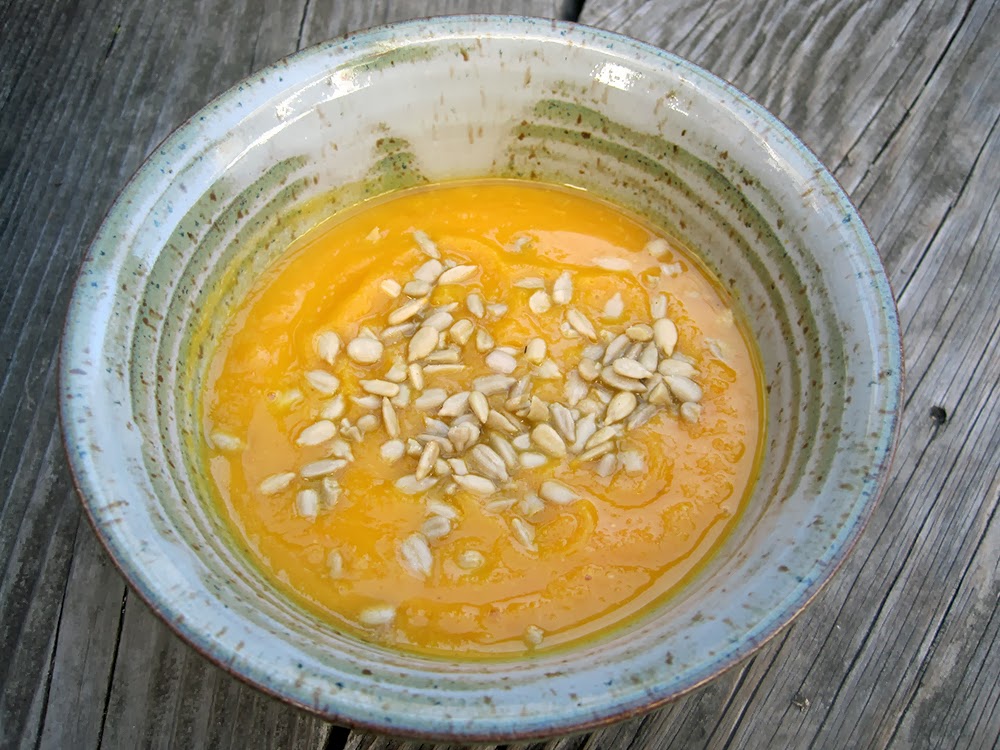
My favorite things about this soup were the details -- first and foremost the lemon zest.  It sounds like a small element, but it added a terrific flavor to the soup and I was totally in love.  The pepitas on top also added great crunch, and kept the pureed soup from feeling like baby food, which I think can sometimes be a problem with this type of soup.  The color was also fantastic - using two large carrots made the soup a bright, vibrant orange, which you sometimes don't get with squash soups.  Definitely a winner - thank you Katrina!


On the side: roasted brussels sprouts and bacon, homemade bread, and carrot-fennel salad (subbing mint for the herbs and adding golden raisins and almonds).

Butternut Squash Soup with Pepitas (adapted from Rachel Ray, via Baking and Boys)
Serves 4

1 small-to-medium butternut squash
Oil spray
Olive oil
2 large carrots, peeled and chopped
1 bulb fennel, cored and chopped
1/2 medium yellow onion, peeled and chopped
Salt and pepper
2 garlic cloves, minced
1 quart (4 cups) chicken stock
1 sprig rosemary
Zest of 1 lemon
Roasted, salted pepitas (hulled sunflower seeds), for garnish

1. Preheat the oven to 400 degrees. Cut the squash into quarters, and scoop out the seeds -- no need to peel.  Spray a foil-lined baking sheet with oil, and place the squash on the baking sheet cut-side-down.  Roast until very soft -- mine took about 30 minutes, but timing will vary based on size and the particular squash.  Remove from oven, and let cool until easy to handle without burning yourself.
2. Heat a couple tablespoons of olive oil in a large pot over medium heat.  Add the carrots, fennel, and onion and season generously with salt and pepper.  Cook, stirring often, until the vegetables are softened, 7-8 minutes.  Add the garlic and cook for another minute or so.
3. Pour in the chicken stock and add the rosemary sprig.  Bring to a simmer.
4. Scoop the squash out of its skin, and add to the pot with the simmering vegetables.  If you have time, simmer for 10 minutes or so all the flavors get nicely combined.
5. Remove the now-wilted rosemary sprig and add the lemon zest.  Puree with an immersion blender (easiest) or in batches in a regular blender or food processor (be careful not to burn yourself!).
6. Serve topped with a generous sprinkle of pepitas.  Leftovers reheat well -- just store the pepitas separately.