Monday, June 30, 2008
Delicious Millet Bread
The taste of the bread is terrific, and the millet adds a fabulous crunch. We ate this bread mostly in sandwiches or as toast, but I bet it would make terrific French toast as well. The main adaptation I made to the recipe was to use more white flour than whole wheat (the reverse of the original recipe), simply because I wanted a lighter loaf.
Remember to check out YeastSpotting for more delicious yeasted treats!
Millet Bread (slightly adapted from The Tassajara Bread Book)
For the sponge:
2 c whole millet, soaked in 1 1/2 c very hot tap water
1 1/2 c lukewarm water
2 packages dry yeast
1/4 c honey
1 c dry milk
4 c white flour
Start the millet soaking and set aside for addition after the sponge has risen.
Dissolve the yeast in the water and let sit until bubbly. Add the honey, dry milk, and 4 cups of flour, mixing well after each addition. Beat well. Cover with a towel and set in a warm place to rise for 45 minutes (longer if the temperature is cooler).
For the bread:
4 tsp salt
1/4 c melted butter, cooled
soaked millet from part 1
2 c whole wheat flour
flour for kneading
Egg wash:
1 egg yolk
Splash heavy cream or half-and-half
Sprinkle the salt over the risen sponge and pour in the melted butter. Stir. Fold in the millet.
Sprinkle in the flour 1/2 cup at a time while kneading. Knead until the dough feels like an earlobe when pressed between your fingers.
Place the dough in an oiled bowl and turn so that the top is coated in oil as well as the bottom. Cover with a damp towel and set in a warm place to rise. Let rise 50-60 minutes until nearly doubled. Punch down. Cover and let rise 40-50 minutes, until doubled.
Punch down the dough and shape into a ball. Cut into two pieces and shape each piece into a ball. Let sit 5 minutes.
For each loaf, knead with each hand about 5-6 times. Roll into a log shape. With seam on the bottom, flatten the top and square off the corners. Put into an oiled loaf pan and press dough into the pan.
Punch down and shape into a ball. Cut into 2 pieces and shape each into a ball. Let sit 5 minutes.
For each loaf, knead with yrach hand about 5-6 times. Roll into a log shape. With seam on bottom, flatten the top and square off the corners. Put into an oiled loaf pan with seam up. Flatten dough. Then turn the loaf over so the seam is on the bottom. Press it again in to the pan. Repeat with the other ball of dough.
Cover with plastic wrap and let rise 20-25 minutes. About 15 minutes before the bread is ready, preheat the oven to 350 degrees.
Whisk together the egg yolk and cream. Brush over top of the loaves. Cut slits in the top to let steam escape. Bake at 350 degrees for 50-60 minutes. Remove bread from pan right away and cool 1 hour before slicing (if you can stand it!)
This bread can be stored in a sealed plastic bag. The recipe recommends the fridge, but we kept ours at room temperature and it was fine.
Sunday, June 29, 2008
June Daring Bakers: Danish Braid
Now, let me tell you, this is not a recipe for the faint of heart. It took me about 2 days to make and I was definitely exhausted by the end. However, it was also totally worth it. You could make this easier by using a prepared filling (I think a delicious jam would be great) instead of making homemade fillings.
So...how were the danishes? Totally amazing. This is definitely one of those recipes where what you can make yourself is better than what you'd get at the bakery. I especially thought this was true with the fruit filling, right out of the oven. Warm danish! Amazing! I made two fillings, chocolate-orange pastry cream and raspberry-peach. The chocolate-pastry cream danish was much prettier, I think because the filling was thicker. The raspberry-peach filling was much too liquid-y, and exploded a bit in the oven, but it tasted amazing. Most tasters preferred the fruit filling, although there were some chocolate-pastry cream devotees as well. My friend John gave me the highest compliment in saying these reminded him of the pastries he got in France! I topped the danishes with a quick glaze of milk and powdered sugar.
The recipe for the danish dough is available here, and I didn't make any changes to it. Below are the filling recipes. I would definitely recommend the chocolate-pastry cream recipe as is, perhaps with a tad less orange zest in the pastry cream. As I said above, the raspberry-peach filling was really too liquid-y, so it might be better in something like danish turnovers. (Although, it did taste amazing, so maybe that's more important than beauty!)
Thanks so much to hosts Kelly of Sass & Veracity, and Ben of What’s Cookin’? and check out everyone's danish braids here!
Orange Pastry Cream (from Sherry Yard's The Secrets of Baking)
2 cups milk
1/2 c sugar
1 1/2 tsp orange zest
1/2 vanilla bean, split and scraped, or 2 tsp vanilla extract
3 T flour or cornstarch
pinch of salt
5 large egg yolks or 3 large eggs, chilled
1 T unsalted butter, softened
Bring the milk, 1/4 c sugar, orange zest, and vanilla bean and seeds to a simmer over medium heat.
Meanwhile, sift together the remaining 1/4 c sugar, the flour or cornstarch, and salt onto a piece of parchment paper. Whisk the egg yolks or eggs in a large bowl. Add the sifted dry ingredients and whisk until fluffy.
When milk comes to a simmer, remove from heat and ladle out 1/2 cup of the hot milk. Drizzle it slowly into the eggs while whisking. Once incorporated, pour the mixture back into the hot milk, whisking constantly. Be sure to scrape all the eggs into the pan with a rubber spatula.
Immediately begin to rapidly whisk the pastry cream. In less than 1 minute, it will boil and begin to thicken. Continue to whisk about 3 minutes, until the cream is the consistency of pudding. To test for doneness, tilt the pan to one side. The cream should pull away from the side of the pan.
Strain pastry cream into a dry bowl. Add the butter and stir until melted and incorporated. If the cream seems grainy, pulse in a food processor until smooth (this really works!).
To make the chocolate-pastry cream filling, spread a generous portion of the pastry cream down the center of your dough (I used about 3/4 of my pastry cream). Top with 9 ounces of finely chopped semi-sweet chocolate (I used Sharffen-Berger).
Raspberry-Peach Filling (from Martha Stewart's Baking Handbook)
3 T freshly squeeze lemon juice
1 T cornstarch
1 1/2 c fresh raspberries
1 1/4 c sugar
Pinch salt
1 medium peach
In a small bowl, whisk together the lemon juice and cornstarch; set aside. In a small saucepan, combine 3/4 c of the raspberries, the sugar, and a pinch of salt. Cook, stirring over medium heat, until the mixture begins to simmer. Stirring constantly, add the cornstarch and simmer, stirring occasionally until the mixture has thickened, 8-10 minutes. Transfer to a bowl and refrigerate until chilled. Strain the cooled mixture into the saucepan, then add the remaining 3/4 c raspberries. Cook until bubbling and thickened. Let cool. While the raspberries are cooling, peel and cut the peach into 1/2 inch dice. Stir into the cooled raspberries.
Beautiful Chocolate-Pastry Cream Danish!
Exploded Raspberry-Peach Danish!
Friday, June 27, 2008
Farro-Chickpea Salad with Asparagus and Feta
Farro-Chickpea Salad with Asparagus and Feta (adapted from Closet Cooking)
Serves 6
3 cups uncooked farro
Olive oil
Salt and pepper
1 1/2 pounds asparagus
2/3 pound mild Italian sausage
3 roasted red peppers, cut into pieces (I used peppers from a jar)
1 can chickpeas, drained and rinsed
Feta cheese, crumbled
3 T balsamic vinegar
3 T olive oil
1 1/2 tsp oregano
1. Bring a pot of water to a boil. Add farro and a pinch of salt, cover, and reduce to a simmer. Simmer farro until it's as tender as you'd like. Drain, then return to hot pot, cover and let sit until the rest of the dish is finished. Before serving, fluff the farro with a fork in the pot.
2. Roast the asparagus. Toss asparagus in a large baking pan with olive oil, salt, and pepper. Roast at 425 degrees for about 10 minutes, until browned and caramelized.
3. While the asparagus is roasting, brown the sausage in a large skillet, using the spatula to break it up into small chunks. When the sausage is fully cooked, set aside on paper towels to drain.
4. When all of the components are ready, combine the cooked farro, sausage, red peppers, and chickpeas in a large bowl. Whisk together the vinegar, oil, and oregano. Season to taste with pepper (don't add salt to the dressing as the asparagus and feta make the dish pretty salty--just add more later if it's not salty enough for you). Pour the dressing over the farro and toss to combine.
5. Serve the salad topped with roasted asparagus and crumbled feta cheese.
Thursday, June 26, 2008
Snickers Macarons
The cookies are super tasty, both at room temperature and chilled. All the flavors blend together perfectly and you definitely get a little Snickers feeling! I ended up using Martha Stewart's macaron recipe along with Tartelette's recipes for all the delicious fillings. Although each part is pretty simple, there are lots of components so you might want to spread this project over two days.
Snickers Macarons (See Tartelette's recipe for the original version)
Recipes for all components are after the photos.
Chocolate macarons
Milk Chocolate Ganache
Peanut Butter Nougat
Peanuts
Dulce de Leche or another caramel sauce
First, spread one macaron with milk chocolate ganache.
Then top with a bit of nougat that has been squished into a disc and half a peanut.
Drizzle some dulce de leche caramel on top.
Top with another macaron that has been spread with milk chocolate ganache (like in the first photo). Enjoy!
Chocolate French Macarons (from Martha Stewart's Baking Handbook)
1 1/4 cups confectioners' sugar
2 T Dutch-process cocoa powder
4 ounces sliced almonds, finely ground, or almond flour
3 large egg whites
Pinch of salt
1/4 cup granulated sugar
1/4 teaspoon pure vanilla extract
1. Preheat oven to 300 degrees. Sift confectioners' sugar and cocoa powder into a bowl. Whisk in almonds; set aside. Line 2 baking sheets with parchment paper or nonstick baking mats (I used tin foil and it turned out fine).
2. Put egg whites in the bowl of an electric mixer fitted with the whisk attachment. Beat on medium speed until foamy, then beat in salt. Beat in granulated sugar, 1 teaspoon at a time, until medium-soft peaks form.
3. Using a rubber spatula, fold half the almond mixture into the egg white mixture until just incorporated. Fold in vanilla and remaining almond mixture until just incorporated. Firmly tap bottom of bowl on counter to eliminate air pockets.
4. Transfer mixture to a pastry bag fitted with a 1/2-inch plain tip (such as Ateco #806). Pipe mixture into 1 1/2 inch circles on baking sheets. (You can also just scoop small mounds of dough with a spoon; the finished cookies just won't be quite as pretty.) Bake, rotating sheets halfway through, until macaroons are slightly firm and can be gently lifted off parchment (bottoms will be dry), 20 to 25 minutes. Let cool on sheets 5 minutes. Transfer macaroons on parchment to a wire rack; let cool completely.
Milk Chocolate Ganache (from Tartelette)
1 cup milk chocolate chips
1/2 cup heavy cream
Place the chips in a small bowl and set aside. Bring the cream to a boil in a small saucepan and immediately pour over the chocolate. Let sit a few minutes, then whisk briskly until everything comes together. Chill until firm. You'll need to let the ganache sit out at room temperature for a while for it to come to a spreadable consistency.
Peanut Butter Nougat (from Tartelette)
2 cups marshmallows
1/4 cup smooth peanut butter
Melt both ingredients together over medium low heat. When everything is fully melted and combined, remove from heat and let cool at room temperature. To use, wait until fully cooled and then shape small pieces into discs.
Dulce de Leche (from Desert Candy)
1 can sweetened condensed milk
Sea salt
Preheat oven to 425 degrees. Pour the sweetened condensed milk into a glass pie plate and stir in a few flecks of sea salt. Put the pie plate into a larger pan and add hot water until it comes halfway up the sides of the pie plate. Cover the pie plate with aluminum foil and bake 1 to 1 1/4 hours until brown and caramelized. Check during baking and add more water as necessary to ensure that the sweetened condensed milk is always surrounded by water. Once the dulce de leche has cooled, whisk until smooth.
Tuesday, June 24, 2008
Yeasted Sugar Cake with Strawberry Sauce
Check out other delicious yeast-y baked goods at Wild Yeast's YeastSpotting roundup.
Yeasted Sugar Cake (from Vegetarian Cooking for Everyone by Deborah Madison)
Cake:
2 1/4 tsp (1 envelope) active dry yeast
1/4 cup sugar
2 cups flour
1/2 tsp salt
1/2 cup warm milk
2 eggs, room temperature
4 T butter, room temperature
Sugar Topping:
2 T butter, softened
1/4 cup light brown or white sugar
1. Stir the yeast and 1 tsp of the sugar into 1/4 cup warm water in a small bowl. Let stand until foamy. Combine the flour, remaining sugar, and salt in a mixing bowl. Add the yeast, milk, and eggs and beat until smooth. Add the butter and beat until the batter is silky. Scrape down the sides, cover, and let rise until doubled in bulk, 45 minutes.
2. Butter a 9-inch tart or cake pan. Stir down the dough. Turn onto a lightly floured surface and shape into a disk; set into pan. (Mine was too sticky to do this; I just scraped it into the pan and it was fine.) Rub softened butter all over the top and then sprinkle with the sugar, using all of the sugar. Let rise for 30 minutes. During the last 15 minutes, preheat the oven to 400 degrees.
3. Bake the cake until well risen, about 25 minutes. The surface should be brown and covered with cracks. Let cool briefly, then unmold and serve warm with strawberry sauce.
Strawberry Sauce
Simple Syrup
Strawberries
To make simple syrup, heat water and sugar in a 1:2 ratio (i.e. 1/4 cup water and 1/2 cup sugar) until boiling. Boil until clear and no longer grainy, then set aside to cool completely.
Hull and cut up your strawberries. I used about 2 pints and it was more than enough for this cake. Puree them in a food processor until very smooth, then pass through a sieve to catch any seeds. (You'll need to push it through with a rubber spatula.) Add simple syrup to taste, starting with a small amount and then increasing as needed to achieve your desired level of sweetness. This is a pretty sweet cake, so I went with a sauce on the tarter side.
Monday, June 23, 2008
Strawberry-Rhubarb Pie
Strawberry-Rhubarb Pie (slightly adapted from Elizabeth Falkner's recipe in The Great American Bake Sale)
4 cups chopped rhubarb (chop very small pieces to ensure everything gets cooked)
3 cups quartered strawberries
1 1/4 cups sugar
1/3 cup flour
1 recipe cream pie dough (below)
Sanding sugar or extra white sugar, for sprinkling
1. In a large bowl, combine the fruit and 3/4 cup of the sugar. Stir together and set aside for 1 to 2 hours to allow the liquid to drain from the fruit.
2. Preheat the oven to 375 degrees.
3. Strain the fruit mixture and add the remaining 1/2 cup sugar and 1/3 cup flour to the fruit.
4. Roll out cream pie dough to a 12-inch circle that is 1/4 inch thick. Center it in a 9-inch pie plate. Pour the fruit mixture into the pie shell and fold the edges up over the top. Some filling will show through in the center. Sprinkle the top with sanding sugar. Bake the pie on a baking sheet for 45-55 minutes until the crust is browned and the fruit juices are thick and boiling. Transfer to a wire rack and serve either warm or cooled.
Saturday, June 21, 2008
Ginger-y Strawberry-Rhubarb Double Crisp
For today, it's this amazing crisp from Dorie Greenspan. This crisp has two unusual elements that really make it stand out. First, it has "crisp" as both a crust and a topping, adding more delicious oats and spices as well as providing a more stable base so that things don't all fall apart when scooping out a piece. Second, the crisp topping/crust includes crystallized ginger, which gives a great kick and really adds to the flavor. Yum!
Ginger-y Strawberry-Rhubarb Double Crisp (adapted from Dorie Greenspan's Cooking from My Home to Yours)
Makes one 9x13 crisp
For the crisp mix:
1 1/2 cups all-purpose flour
1 1/2 cups packed brown sugar
heaping 1 cup rolled oats
3/4 tsp ground ginger
pinch salt
pinch cinnamon
3/4 cup finely chopped walnuts
1/4-1/2 cup very finely chopped crystallized ginger (depending on how ginger-y you'd like it)
1 1/2 stick (12 T) unsalted butter, melted and cooled
For the filling:
2 large stalks rhubarb
4 1/2 T cornstarch
3/4 cup cold water
4 1/2 cups strawberries, hulled and sliced (about 18 ounces)
1 1/2 cup sugar
3/4 tsp ground ginger
1 1/2 tsp vanilla
1. Preheat the oven to 350 degrees. Butter or spray with oil a 9x13 Pyrex baking dish.
2. Make the crisp mix. Put the flour, brown sugar, oats, ground ginger, salt, and cinnamon in a large bowl and sift the ingredients with your fingers to blend them, making sure to break up any lumps of brown sugar. Mix in the nuts and crystallized ginger, then pour over the melted butter. Using a fork, stir the ingredients together. Spoon half the mixture into the baking dish and pat down lightly to form a crust. Set aside remaining topping.
3. Cut up the rhubarb. Cut each stalk lengthwise into 3-5 long strips, then cut the strips into 1-inch pieces. Make sure the strips of rhubarb are thin or they won't cook all the way through! Lay out the rhubarb in a closely-packed single layer on the crust (no need to be super-fastidious with this). I used about 1 1/2 large stalks of rhubarb to accomplish this; your mileage may vary depending on the size of your rhubarb.
4. Make the strawberry filling. Dissolve the cornstarch in the cold water and set aside. Put the strawberries, sugar, and ground ginger in a medium saucepan and mash up the berries with a fork, pastry blender, or potato masher. Place the pan over medium heat and stir occasionally until the mixture comes to a full boil. Pour the dissolved cornstarch into the pan and, stirring with a whisk, bring everything back to a boil. Keep cooking and stirring until the strawberry filling is thick and no longer cloudy, about 3 minutes. Pull the pan off the heat, stir in the vanilla, and pour the filling over the rhubarb. Scatter the remaining crisp mix over top.
5. Bake the crisp 45-60 minutes until the topping is golden and the strawberries are bubbling up around the edges. Serve warm.
Thursday, June 19, 2008
Fruity Brown Butter Cornmeal Muffins
These looked so beautiful coming out of the oven! And the taste was even better. Pleasantly sweet, slightly crunchy from the cornmeal, and just the right amount of delicious surprises from the fruit. Amazing! This recipe is definitely a keeper, and so easy to pull together for a quick weekend breakfast.
Fruity Brown Butter Cornmeal Muffins (adapted very slightly from Joy the Baker, original here)
3/4 stick butter
1 cup flour
1 cup cornmeal
1/3 c sugar (heaping for sweeter muffins; less for non-sweet tooths)
1/2 tsp baking soda
1/2 tsp baking powder
1/2 tsp salt
1 egg
1 cup sour cream
1/3 cup milk
2 T maple syrup
1 cup fruit, diced (I used apricots, strawberries, and cherries)
1. Preheat oven to 400 degrees. Brown the butter in a skillet over medium high heat. Measure out 1/4 cup of the browned butter and let cool slightly.
2. Combine the dry ingredients and whisk together. In a small bowl, combine the egg, sour cream, and milk, and maple syrup. Whisk until no lumps remain. Pour the 1/4 cup butter into the sour cream mixture and whisk until incorporated. Add the wet ingredients to the bowl of dry ingredients, and mix just until moistened.
3. Fold in the fruit.
4. Grease and fill muffin tins (my batch made 12 normal-sized and 9 mini muffins). Bake 15 minutes or until a tester comes out clean. Serve warm!
Tuesday, June 17, 2008
Tag, you're it!
The rules:
Each player answers the questions about themselves. At the end of the post, the player then tags 5 people and posts their names, then goes to their blogs and leaves them a comment, letting them know they’ve been tagged and asking them to read your blog. Let the person who tagged you know when you’ve posted your answer.
What was I doing ten years ago?
I was 14, so I guess I was a freshman in high school in Northeast Ohio
What are five (non-work) things on my to-do list for today?
1. Dishes from last night's grilling
2. Go on my 2nd run of week 3 in my new running program
3. Get photos off my camera
4. Stop by Walgreen's to pick up some stuff
5. Start planning for my dad's super sekrit Father's Day baking project (he and my mom will be in town this Thursday so we're celebrating then)
Five snacks I enjoy:
1. Cupcakes
2. Lay's potato chips and Reese's peanut butter cups
3. Nachos
4. Raspberries
5. Stonyfield Farm maple yogurt
Things I would do if I were a billionaire:
1. Go on a giant shopping spree at Sephora and Victoria's Secret
2. Hire a private jet so that I could go back to visit my parents in Ohio anytime
3. Donate lots of money to the DNC and the Human Rights Campaign
4. Eat dinner at Chez Panisse at least once a month
Places I’ve lived:
1. Columbus, Delaware, Doylestown, and Oberlin, Ohio
2. Albuquerque, New Mexico
3. Berkeley, California
Jobs I’ve had:
1. Babysitter; child-care worker at a day care
2. Canvasser for NM-PIRG
3. TA and research assistant in college; grad student researcher
Tag…you’re it!! Let’s hear from these five awesome bloggers!
Visions of Sugar Plum
Joy the Baker
I Heart Cuppycakes
Genesis of a Cook
The Pioneer Woman
Sweet Potato-Blue Cheese Scones
These are also perfect for the ARF/5-A-Day Roundup over at Sweetnicks. Go check out the other yummy fruit-and-veggie dishes there!
Sweet Potato-Blue Cheese Scones (from the Esalen Cookbook)
Makes approximately 1 million scones (a/k/a you might want to halve this)
1 large yellow onion
1 tablespoon vegetable oil
2 medium-sized sweet potatoes
8 oz. can artichoke hearts in water
1 3/4 c all-purpose flour
1 1/2 c whole wheat flour
1/2 tsp baking soda
1 1/2 tsp baking powder
1 tsp sea salt
pinch cayenne pepper
1 c unsalted butter
2 1/2 c grated Asiago cheese
1/2 pound crumbled blue cheese
2 T chopped fresh sage
1. Chop the onion into 1/2 inch dice and saute in a skillet with a small amount of oil until brown. Peel and chop the yams into 1/2 inch cubes and lightly steam until cooked but still firm. Drain artichoke hearts and cut into quarters. Put the onion, yams, and artichoke hearts in a large bowl and set aside.
2. Sift flours, baking soda and powder, salt, and cayenne into a mixing bowl. Cut butter into 1 inch chunks and then cut butter in to the dry ingredients. Butter should be about the size of peas or smaller. Gently fold in the Asiago cheese and half of the blue cheese.
3. Mix the sage into the yam mixture and fold the mixture into the dough. Briefly mix until the dough comes together. You may need to add a little water or milk to get everything to hold together. The dough will be chunky and have a sticky texture.
4. Scoop out portions of dough to the size of scones you would like. Place on a greased baking sheet. Flatten each scone a bit and make a small depression in the top. Place bits of blue cheese into the depression on each scone. Bake in a preheated oven at 350 degrees for about 30 minutes, until the scones are light brown. Serve warm or reheat leftovers in the toaster.
Sunday, June 15, 2008
Blondies
Although I loved these, they still didn't quite reach blondie heaven for me. Does anyone from Northeast Ohio know a recipe for blondies that tastes at all like the West Point Market's version? Those blondies are dense, caramel-y, and super moist (sort of like extra fudge-y brownies without the chocolate). Still, although these were a different confection, they were still fabulous.
Blondies (adapted slightly from Sherry Yard's The Secrets of Baking)
2 c all-purpose flour
1 tsp baking powder
1/2 tsp salt
6 oz. softened butter
1/3 c sugar
1 c packed golden brown sugar
4 large eggs
1 T plus 1 tsp light corn syrup
1 T vanilla extract
dulce de leche (or another good quality caramel sauce)
1. Preheat the oven to 350 degrees. Spray a 9x13 baking dish with oil.
2. Sift the flour, baking powder, and salt in to a medium bowl and set aside.
3. Using a stand mixer fitted with a paddle attachment or a hand mixer, beat the butter on high speed until soft and creamy, about 1 minute. Slowly add the sugars and beat on high speed until light and fluffy, about 5-7 minutes. Scrape down the sides of the bowl.
4. Add eggs one at a time, beating well after each addition. Add corn syrup and vanilla.
5. Slowly add dry ingredients and mix on low speed until just combined.
6. Pour half of the batter into the pan and spread it out (this will be a little tough given the greased pan). Spread dulce de leche on top (use however much you like; I used about half a jar). Spread the remaining batter on top. Don't worry too much if it mixes together a bit, but do try to keep the layers separate.
7. Bake for 25-30 minutes until a toothpick comes out clean.
8. Blondies will keep for 3 days at room temperature or 3 weeks in the freezer if wrapped airtight.
Saturday, June 14, 2008
Chocolate Brioche
The recipe says this would make great French Toast, which I think would be the case...but I will have to make it again to try, because we gobbled it all up too fast!
Chocolate Brioche (from Sherry Yard's The Secrets of Baking)
Yields 2 loaves
For the chocolate butter:
2 oz. bittersweet chocolate, finely chopped
1 stick unsalted butter, softened
1/4 c unsweetened cocoa powder
For the sponge:
2 1/2 tsp active dry yeast (one package) or 1 cake fresh yeast
1/4 c warm water
3/4 c lukewarm brewed coffee
1/2 c bread flour
1/3 c sugar
For the dough:
3 c bread flour
1 3/4 tsp salt
4 large egg yolks, lightly beaten
4 oz. bittersweet chocolate, finely chopped
For the egg wash:
1 large egg yolk
1 T heavy cream
For the chocolate butter:
Melt the chocolate and set aside to cool. In the bowl of a standing mixture fitted with a paddle attachment, cream the butter until soft and lump free, about 1 minute Add the cocoa powder and cooled melted chocolate and beat until well incorporated. Set aside at room temperature.
For the sponge:
Combine yeast and water in the bowl of a standing mixer fitted with the paddle attachment and whisk until dissolved. Let stand 5 minutes until bubbly, and then stir in the coffee, flour, and sugar, forming a thin batter. Cover with plastic film and let rest at room temperature for about 30 minutes, until bubbles form.
For the dough:
Sift together flour and salt into sponge, then add the egg yolks. Mix on low speed with the paddle attachment until the egg yolks are absorbed, about 2 minutes. Increase speed to medium and knead dough for 5 minutes, until smooth and satiny.
On medium low speed, add the chocolate butter, 1 tablespoon at a time. Stop the mixer and scrape down the sides of the bowl. Switch to the dough hook. Mix until dough is shiny and smooth, about 5 minutes. Add the chopped chocolate and knead until incorporated. Scrape out the dough, shape into a ball, and place in an oiled bowl. Turn so the top is coated with oil too. Cover with plastic wrap and let rise until doubled, about 2 hours.
When the dough has doubled, punch it down. Let rise again until doubled, about 45-60 minutes at room temperature or 4 hours in the fridge (or overnight in the fridge).
Spray two loaf pans with oil. Turn the dough out onto a lightly floured work surface and divide in half. Using a rolling pin, roll each half into a rectangle with a width equal to the length of the pan. Roll up the rectangle and place seam-side down into the prepared pan.
Cover with oiled plastic wrap and proof until the dough fills the pans, 15 to 20 minutes if the dough is at room temperature and 1 1/2 to 2 hours if cold. Preheat the oven to 350 degrees.
For the egg wash:
Whisk the egg yolk and cream together in a small bowl. Gently brush with egg wash.
Baking:
Bake 40-45 minutes until the loaves sound hollow when thumped on the bottom. Remove from pans and cool on a rack before serving. When cool, loaves can be wrapped in plastic and frozen for up to 2 weeks. Defrost in the fridge overnight and then wrap in aluminum foil and refresh in a 350 degree oven for 10 minutes. Or, wrap tightly and keep at room temperature for up to 2 days (if they last that long!)
Friday, June 13, 2008
White Sandwich Bread
I made delicious sandwiches with the bread: a great caramelized onion mustard I got in Sonoma with my parents, thinly sliced avocado, and sharp Wisconsin cheddar. Amazing!
White Sandwich Bread (from King Arthur Flour)
3 cups all-purpose flour
1/2 cup milk
1/2 to 2/3 cup hot water, enough to make a soft, smooth dough
4 T (1/2 stick) melted butter or 4 T vegetable oil
2 T sugar
1 1/4 tsp salt
1 packet active dry yeast dissolved in 1 T warm water OR 2 tsp instant yeast
1 T cold butter
Mix the cold milk with 1/2 c hot water to make a luke-warm liquid. In a large bowl, combine all of the ingredients and stir till the dough starts to leave the sides of the bowl. Transfer the dough to a lightly greased surface, oil your hands, and knead it for 6 to 8 minutes, or until it begins to become smooth and supple. (I did this stage in my stand mixer, which worked as well). Transfer the dough to a lightly greased bowl, cover the bowl, and allow the dough to rise till puffy though not necessarily doubled in bulk, about 60 minutes, depending on the warmth of your kitchen.
Transfer the dough to a lightly oiled work surface. Press/roll it out to a rectangle the length of your loaf pan. Press out any air bubbles and then roll up the dough into a log. Place the log in a lightly greased loaf pan, cover the pan loosely with lightly greased plastic wrap, and allow the bread to rise for about 60 minutes, until it’s domed about 1 inch above the edge of the pan. A finger pressed into the dough should leave a mark that rebounds slowly.
Bake the bread in a preheated 350°F oven for about 30-35 minutes, until it’s golden brown. Test it for doneness by removing it from the pan and thumping it on the bottom (it should sound hollow), or by measuring its interior temperature with an instant-read thermometer (it should register 190°F at the center of the loaf). Remove the bread from the oven and immediately rub the top crust all over with butter. Let the loaf cool for 10-15 minutes, and then remove from pan. Store any leftovers in a plastic bag at room temperature.
Red Velvet Anniversary Cake
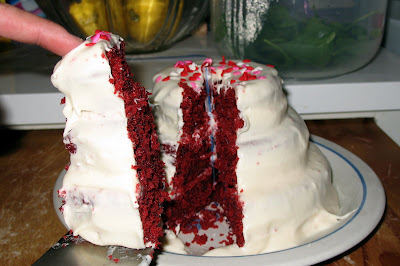
The recipe I chose was from The Great American Bake Sale, a neat cookbook that presents favorite recipes from a variety of chefs and cookbook authors. I've been very impressed with the recipes from this book in the past, so I thought I'd give Stephanie Hall's "No-Mistake Red Velvet Cake" a try. The cake was super yummy, moist with a good buttermilk flavor. It rose more than I thought it would, which created a little bit of a problem with my pans, but overall it worked really well and was easy to work with. The cream cheese frosting was also delicious, but way too runny to ice a faux-wedding cake. (I can see why wedding cake decorators use that gross frosting...it looks much nicer!) So, if I were making this recipe into cupcakes, I would certainly use Hall's frosting...but if I were trying to make a layer cake, I'd look for a firmer cream cheese frosting. It also may not have helped that this was a rather warm day! Overall, I was really happy with how the project turned out and Kathryn, Chris, and their son James seemed to like the cake as well! Thanks to them for these photos as mine didn't turn out as well.
No-Mistake Red Velvet Cake (from Stephanie Hall)
1 cup buttermilk
1 tsp white vinegar
1 tsp baking soda
1 ounce bottle of red food coloring
2 cups sugar
2 large eggs
2 cup vegetable oil
2 1/3 cups flour
1 tsp salt
1 tsp vanilla
1 T Dutch-process cocoa powder
1. Preheat oven to 325 degrees. Grease 2 round 9-inch cake pans and line the bottom of each with a circle of parchment. Grease the parchment paper.
2. Combine all ingredients in a large bowl and beat on low speed for 1 minute until everything is incorporated. Scrape the sides and increase speed to medium. Beat for 2 minutes. Divide batter between prepared pans and smooth the surface with a spoon.
3. Bake 25-30 minutes until a toothpick comes out clean. Cool 15 minutes and then invert and remove from pan.
Cream Cheese Frosting (from Stephanie Hall)
5 oz. cream cheese, softened
4 1/2 T unsalted butter, softened
3 c confectioners' sugar
2 tsp vanilla
1 tsp heavy cream
1/2 c finely chopped pecans (optional)
Beat together cream cheese and butter until smooth. Scrape the bowl, the reduce speed to low. Gradually add the sugar and mix until incorporated. Add vanilla and cream and mix until smooth. Fold in the nuts, if using.
Monday, June 9, 2008
Creamy Goat Cheese Pasta with Zucchini and Sausage
Also, this seemed like the perfect entry for Presto Pasta Nights, a great blog event that collects pasta recipes each week. So if this recipe makes you hungry for more, why not check out the other entries or enter yourself? The host this week is Kevin of Closet Cooking, and many thanks to the original host of Presto Pasta Nights, Ruth of Once Upon a Feast.
Creamy Goat Cheese Pasta with Zucchini and Sausage (adapted from Fine Cooking)
Serves 3
Kosher salt
1/2 lb. dried rigatoni
1/2 lb. hot Italian sausage
2 medium shallots, finely chopped
1 1/2 cups yellow and green summer squash, cut into 3/4 inch dice
3 oz. fresh goat cheese, crumbled
1 tsp finely chopped parsley
Freshly ground black pepper
Parmigiano-Reggiano to serve
Bring a large pot of salted water to a boil. Put in the rigatoni and cook until just shy of al dente, 10 minutes.
Meanwhile, heat up a non-stick skillet on medium-high and crumble the sausage into it. Cook until almost cooked through, about 3-5 minutes. Using a slotted spoon, transfer to a bowl. In the leftover sausage fat, cook the shallots over medium heat until they begin to soften. Raise the heat to medium high and add the squash. Cook, stirring frequently, until the squash is barely tender, 3-5 minutes.
Reserve 1/2 c of the pasta water and drain the rigatoni. Return the pasta to its pot and add the sausage, the squash mixture, and a splash of the cooking water. Toss over medium heat until everything is perfectly cooked, about 3 minutes. Add more pasta water as necessary to keep everything moist.
Remove from heat and add the goat cheese and parsley. Toss until the cheese melts and coats the pasta. Season to taste with salt and pepper and serve with Parm-Regg to sprinkle on top.
Saturday, June 7, 2008
Easy Whole Wheat Rolls and Split Pea Soup
The split pea soup is similarly delicious. It's easy to make it vegan, although I put a knob of butter in with the veggies for flavor. It was very flavorful and I didn't miss the bacon or ham at all. The original recipe says to blend some of the mixture to make a smoother soup, but we liked it chunky. I made this with my sister Anna while she was in town. We added more veggies than called for just because we had them and thought they'd be yummy.
Easy Whole Wheat Rolls (from Whole Foods)
1 1/4 cups whole wheat flour
2 tablespoons sugar
1/2 teaspoon salt
1 package active dry yeast
1 cup warm milk
3 tablespoons butter, melted and cooled
1 large egg, room temperature and lightly beaten
1 cup white flour
Have all ingredients at room temperature to start. In a large bowl, mix the whole wheat flour with the sugar, salt, and yeast. Add the milk, butter, and egg. Beat until smooth. Add the white flour, mixing until fully incorporated. The batter should be smooth. Cover and allow the dough to rise until doubled in bulk, about 45 minutes to one hour.
Meanwhile, lightly spray 12 muffin tins with oil. Set aside.
Once raised, stir the batter down. Spoon even amounts of the dough into prepared muffin tins. Allow this to rise until the dough comes just over the top of the muffin tins, about another 45 minutes to one hour.
Preheat oven to 400°F. Bake the rolls for 15 to 20 minutes or until golden brown.
Vegan/Vegetarian Split Pea Soup (from Lisa's Recipes; original recipe here)2 teaspoons olive oil
1 pat of butter (optional)
3 carrots, peeled and chopped
2 stems celery, chopped
1/2 large onion, chopped
1/4 tsp dried thyme
1 quart vegetable stock
1 1/3 c dried split peas
salt and pepper
lemon wedges (optional)
Heat the oil and butter in a large pot. Add the veggies and thyme and cook for 10 minutes. Add the stock and peas and bring to a boil.
Lower the heat and simmer until everything is tender, about 1 hour. If you'd like a smoother soup, you can puree 2/3 of the soup in a blender and then add it back in. For a chunkier soup, don't worry about pureeing anything. Add a bit more stock if the soup is too thick for your liking.
Add salt and pepper to taste. Optionally, serve with lemon wedges to squeeze over top.
Tuesday, June 3, 2008
Summer Fruit Crepes
Delicious Crepes (adapted from Luscious Lemon Desserts by Lori Longbottom)
1 c flour
pinch salt
1 large egg, lightly beaten
3/4 c milk
1/2 c water
butter
1. Whisk together flour and salt in a medium bowl. Make a well in the center and add the egg. Gradually whisk in the milk and water until blended. Let rest at room temperature for 1 hour or chill in the fridge for up to 24 hours.
2. Coat a crepe pan or a 6 inch nonstick skillet with a thin layer of butter and heat over medium high heat. Pour in 2 T of the batter and tilt to spraed the batter evenly. Cook both sides until medium brown. The crepes do not stick together, so you can just pile them up on a plate until ready to eat. We liked ours with fresh nectarine slices, raspberries, and whipped cream.